Learning Cinnamon
What is Cinnamon?
Cinnamon is a web-based tool designed to help patient advocates manage enrollments in programs like Patient Assistance Programs (PAP), Copay, and Foundations, ensuring patients get access to high-cost medications. The app seamlessly integrates with health systems via HL7 or manual entry, allowing advocates to efficiently manage patient data, tasks, programs, insurances, prescriptions, documents, drug shipments, reimbursement, claims, enrollments, signatures, health system (advocates, providers, locations and departments).
A key feature is the Coverage Waterfall, which automatically matches patients to programs based on their prescriptions, insurance, and federal poverty level (FPL). Any changes to these details trigger the waterfall to reassess eligibility, ensuring the most relevant programs are suggested. Insurance plays a vital role in determining which programs are available, with patients having different options depending on whether or not they have coverage.
Cinnamon also supports managing tasks like drug shipments, claims, and provider information. Advocates can track and manage every aspect of patient care, from adding prescriptions to handling program enrollments, while integrated reporting tools help monitor performance and outcomes.
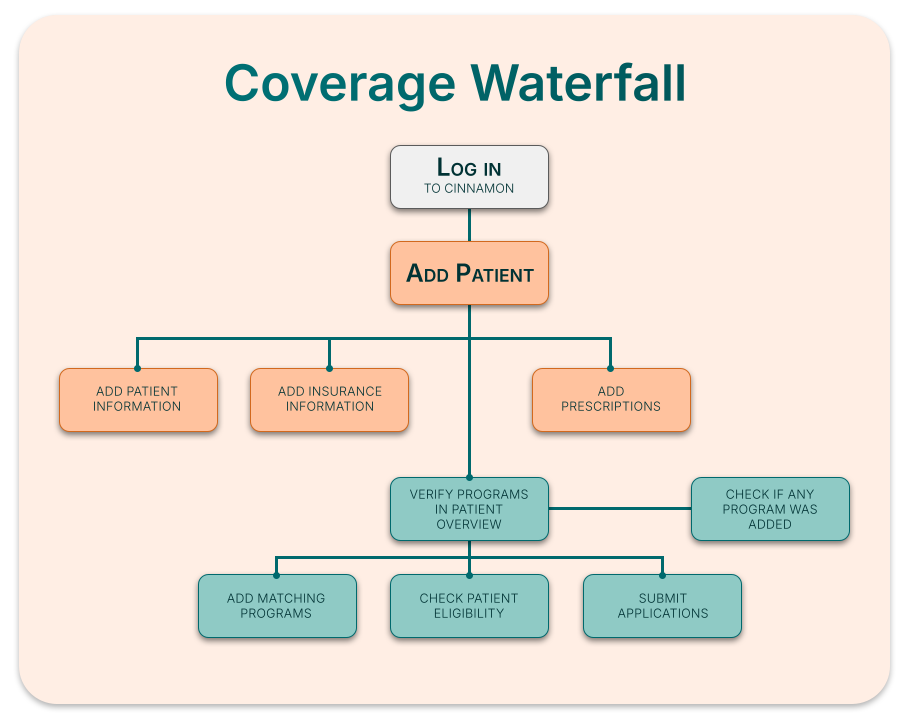
Coverage Waterfall
Coverage Waterfall works with the information inside the patient’s case to search for possible eligibility and program matches. Important information for the coverage waterfall to work and find the best results are the prescriptions, diagnoses and insurances that the user can add in the patient case. After the details are added to the patient, the program will run based on the information the user provides. Programs that match will then be added to the programs section in the patient overview.
- Workflow: After logging into Cinnamon, create a patient by clicking Add Patient in the Tasks or Patients tab, or open an existing patient case by selecting one from the eligible worklist or by searching their name or Medical Record Number (MRN). In the patient’s case, the Advocate should add key information, such as prescriptions, diagnoses, insurance details, and financial data, which are essential for identifying program opportunities and ensuring accurate coverage assessment. Once all information is added, review available programs, check eligibility, and follow the enrollment instructions for each program.
Tasks
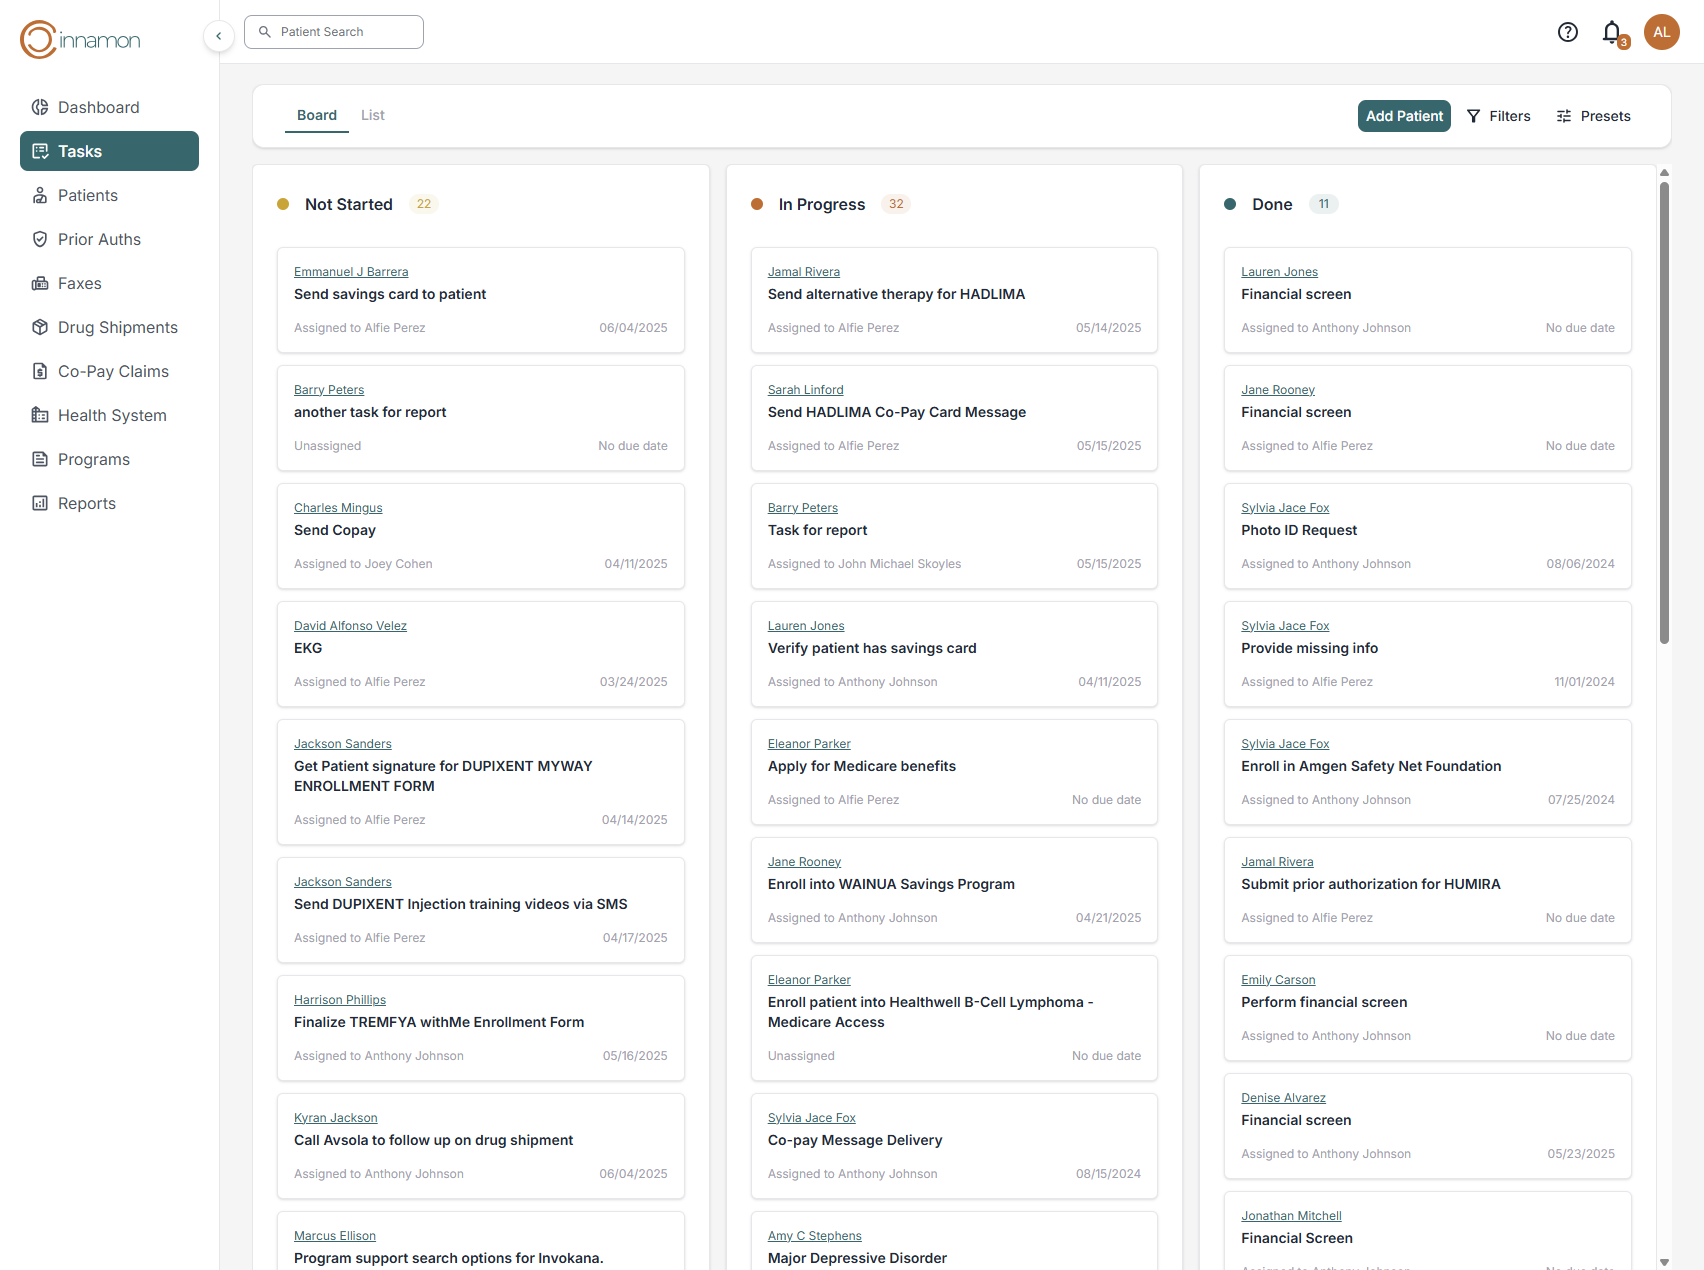
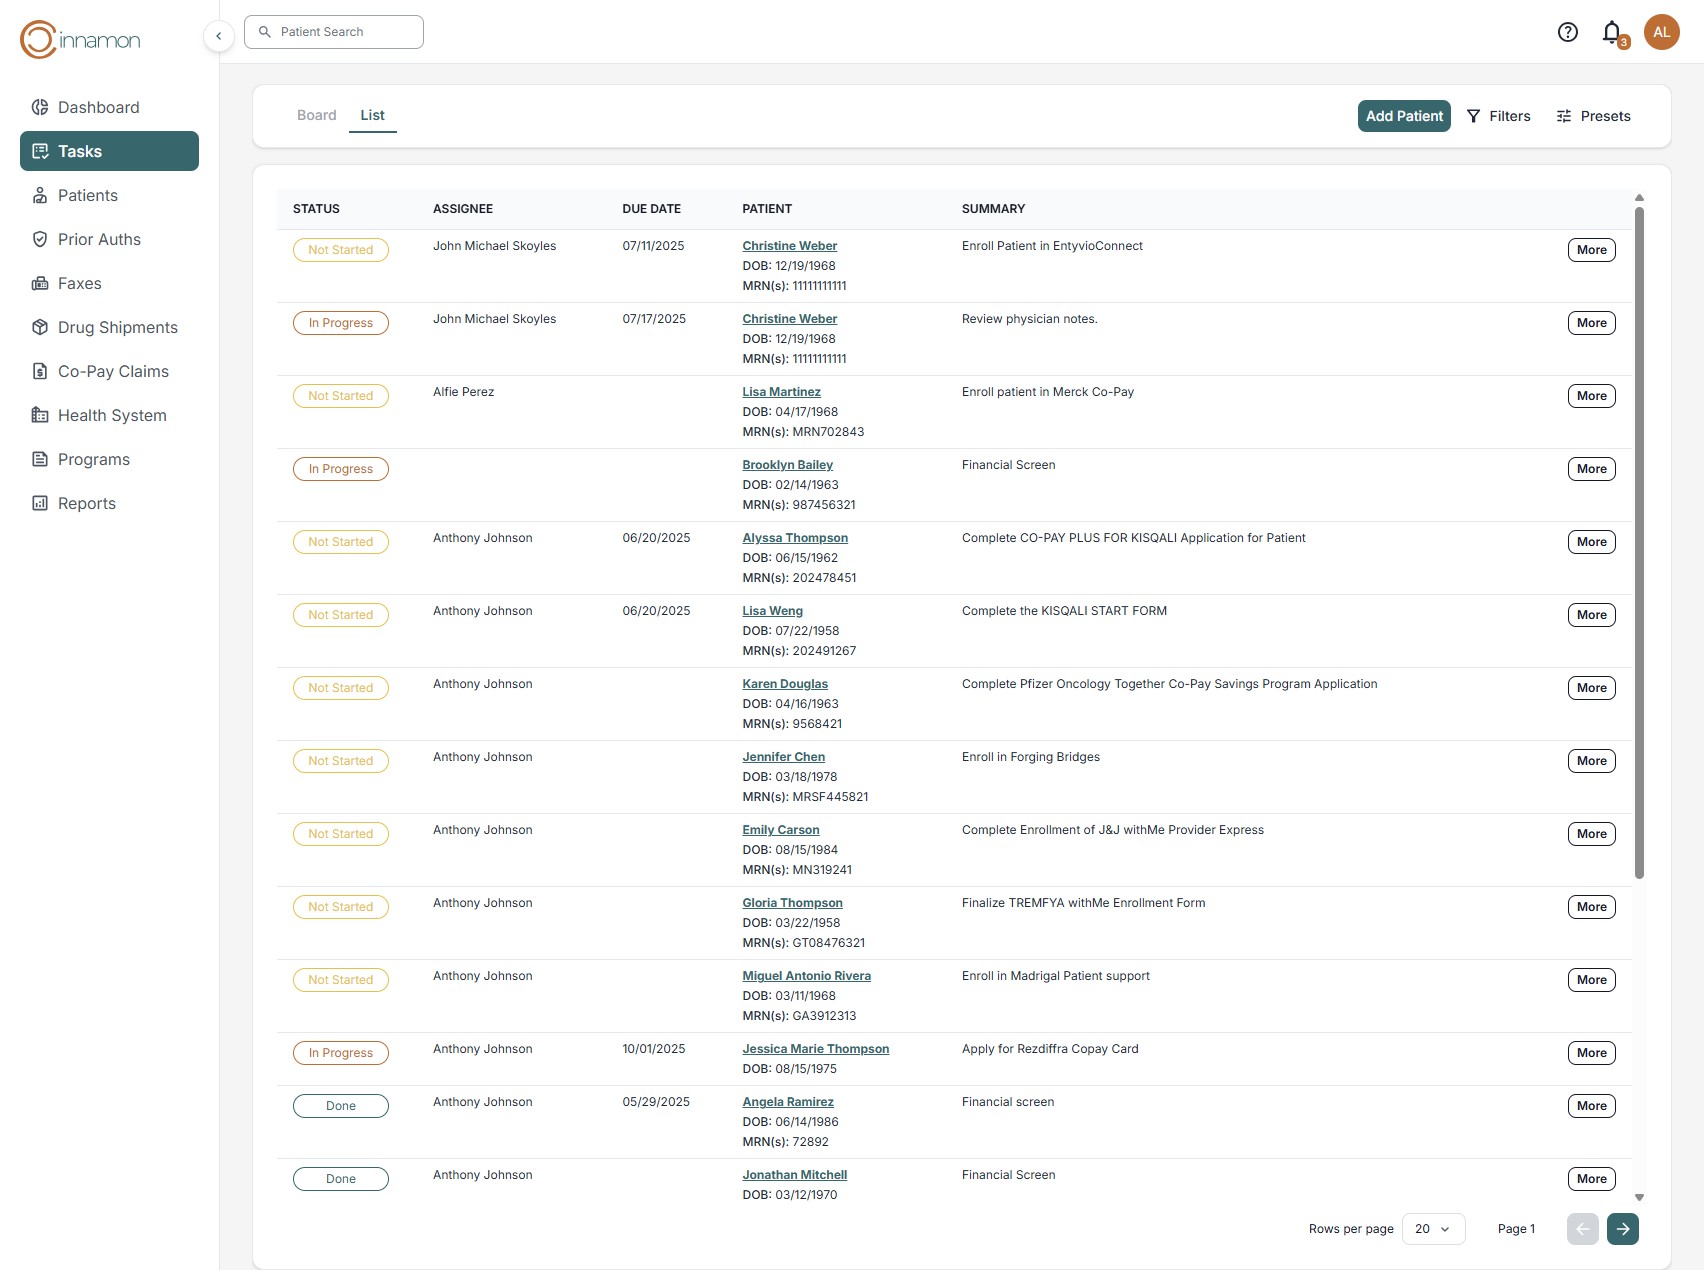
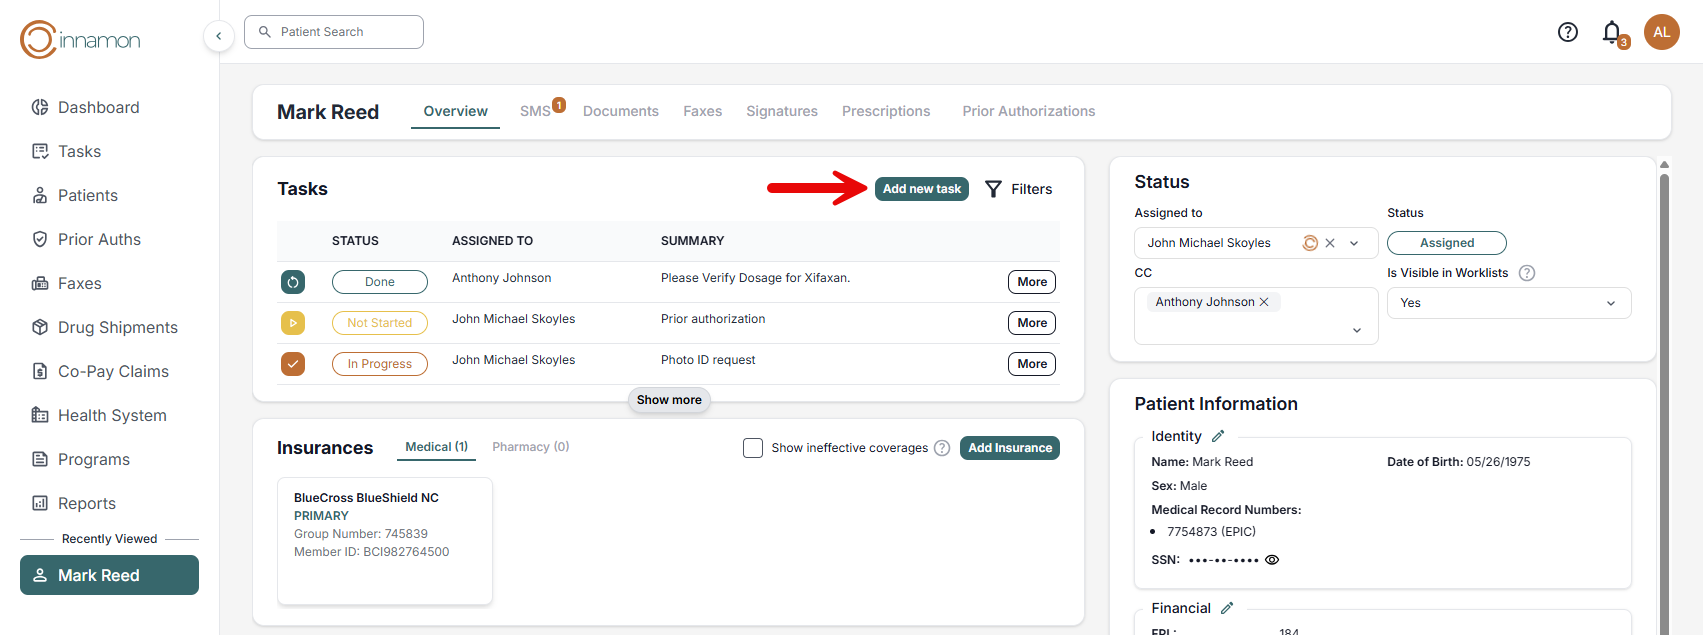
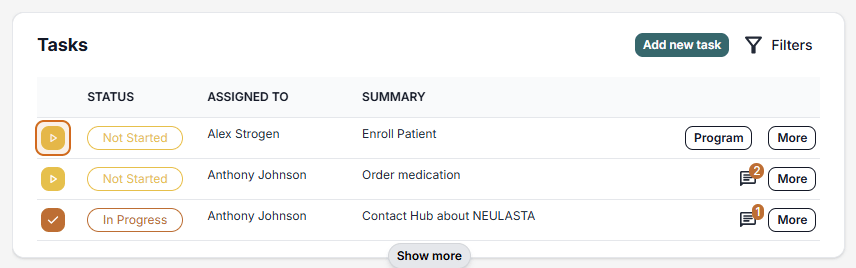
When you log into Cinnamon, the task dashboard is the first screen you’ll see. Here, you can manage all of your tasks. The Cinnamon platform supports three different statuses: Not Started, In Progress, and Done. Tasks will be displayed in either the board view or the list view. You can also filter tasks by program type, treatment location, assignee, and task type (manual or auto created).
This view allows you to see all tasks across your Health System. The board allows you to drag and drop task cards around each status column. Doing this will allow the user to reorder or change the status of any task. To see more information about a task, simply click on the card.
This view offers the same functionality as the board view, but instead of a task card layout, tasks are displayed in a table format. You can filter, edit, assign tasks, and update statuses using the ‘More’ button in each task row from the table.
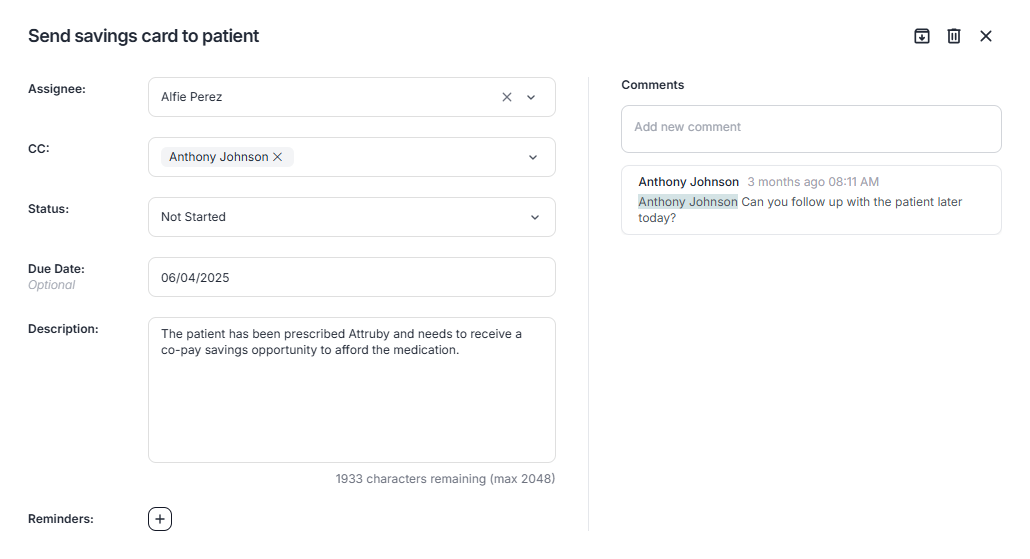
When you select at task, a modal window will open up with more details about the task. This window will show a summary of the task. Additionally, you can set a due date and copy other members of your team. To add a reminder, click on the ( + ) button and add the reminder. Advocates can tag other users using the @ symbol in the comments section as well.
Tagged users will receive a notification alerting them that they’ve been mentioned.
Task Creation
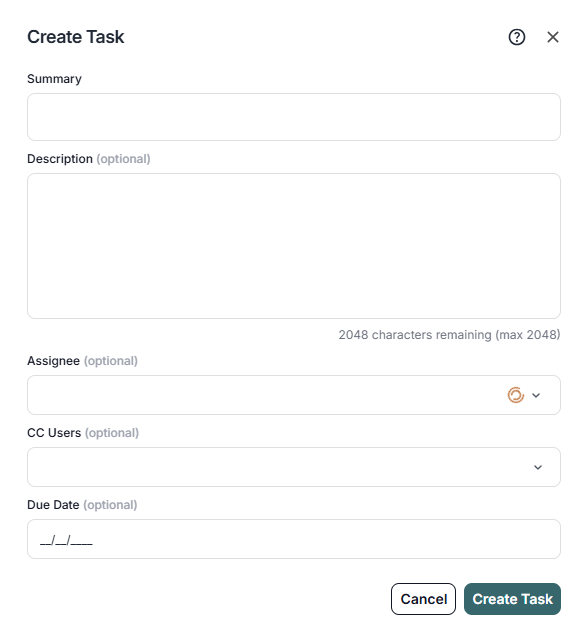
The Cinnamon platform offers three different ways to create a task:
- Inside a patient case.
-
Inside a Program opportunity in the patient case.
-
Inside an Encounter in the patient case.
When creating a task, a summary is required. Optionally, you can add a description, assignee, CC users, and due date. When all the relevant details have been entered, simply click the “create task” button to complete the process.
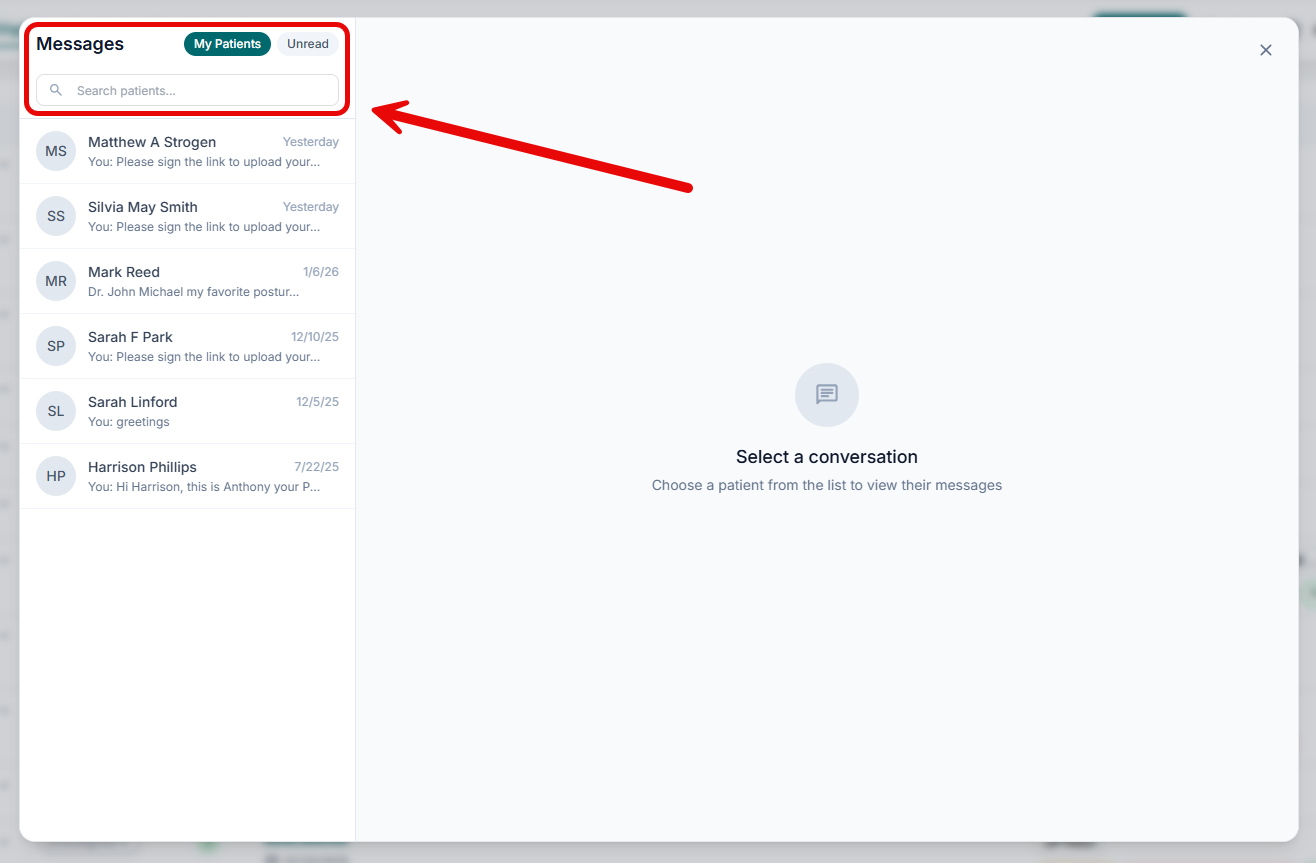
Global SMS
The Global SMS feature, similar to iMessage or WhatsApp, allows users to communicate with patients without the need to visit each case file individually. Users can see a complete list of all SMS conversations. Users also have the ability to filter down by “unread” messages or by assigned patients.
Global SMS Step by Step
- To access the Global SMS feature, click on the chat icon next to the notification bell on the top right of the screen.
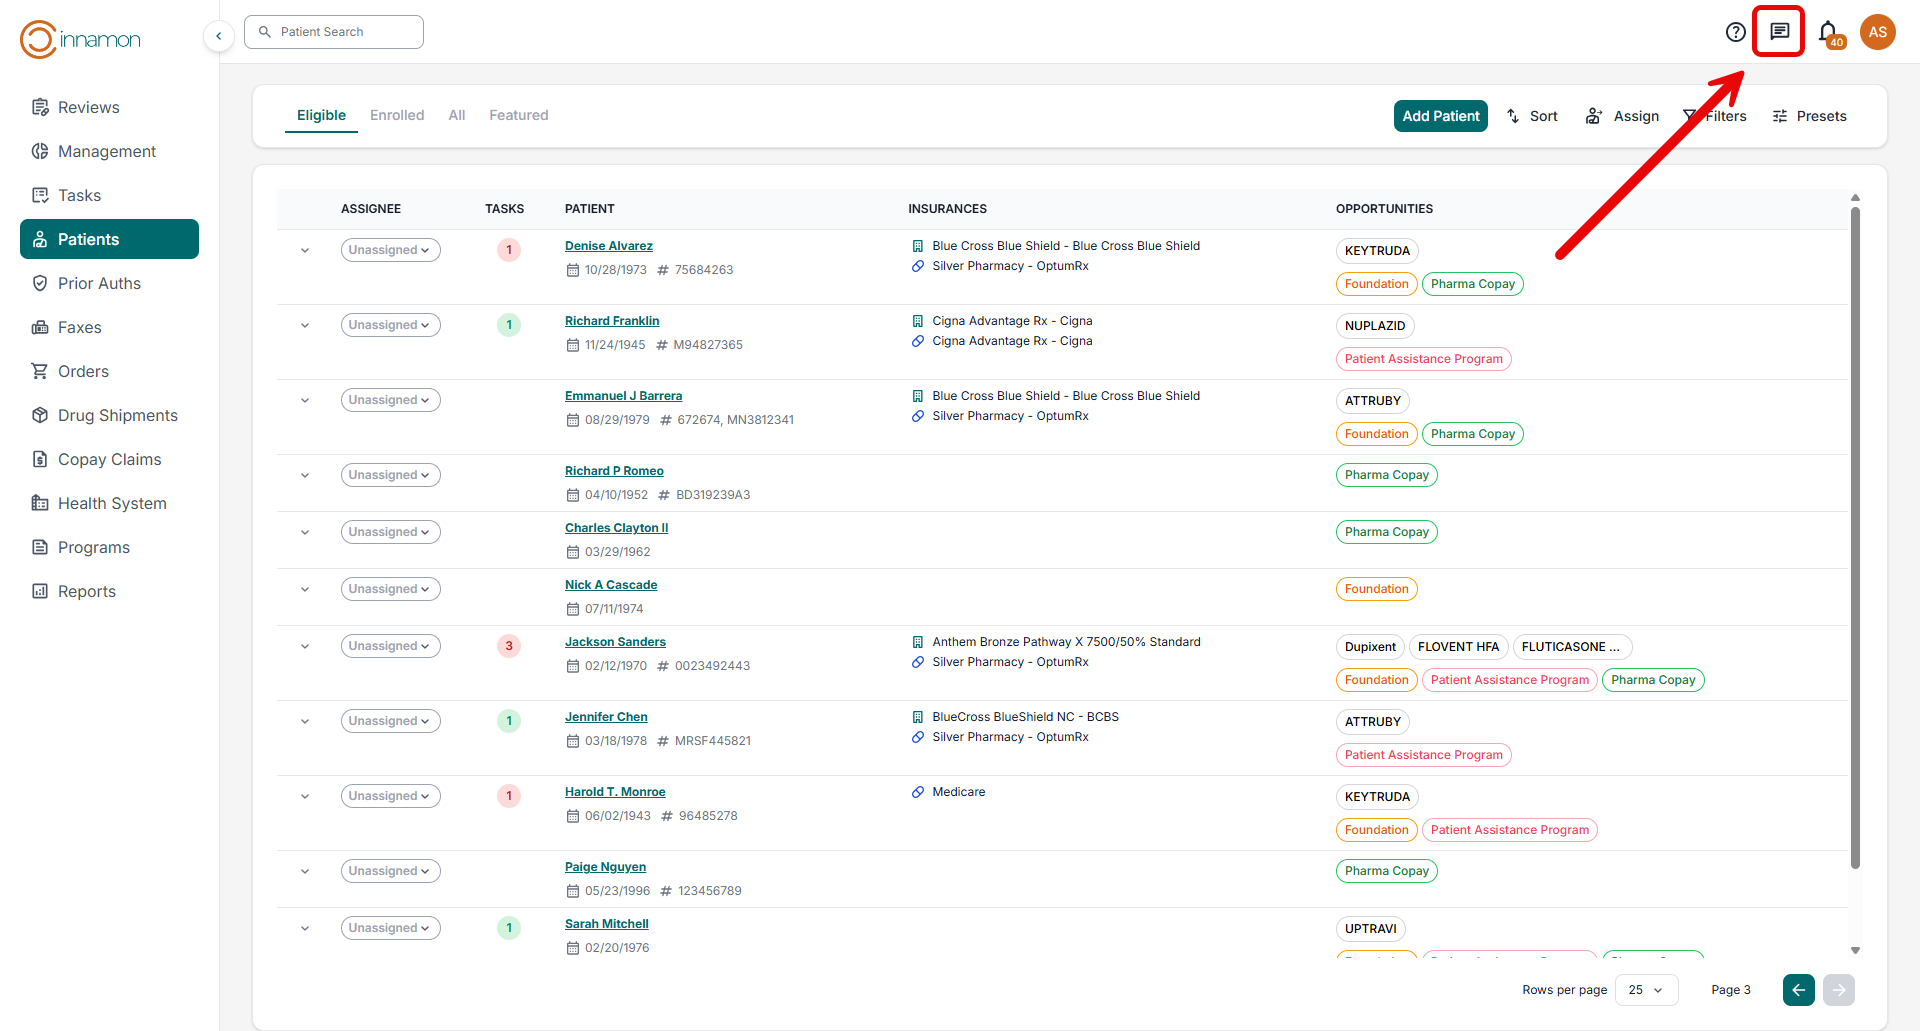
- From this chat window, users have access to all chat conversations in Cinnamon.Users can search by name or by MRN. Additionally, users can filter conversations by unread status as well as by their assigned patients.
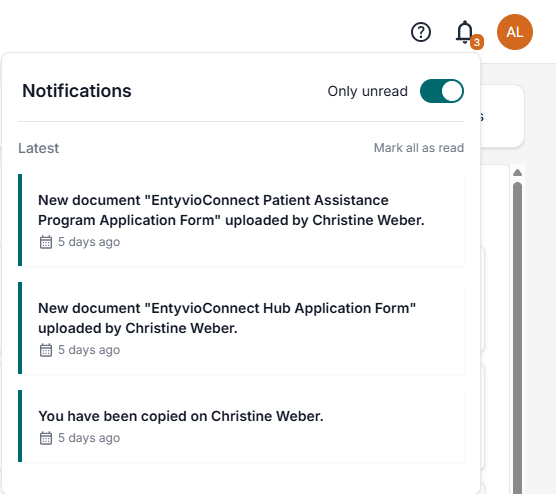
Notifications
Cinnamon will send Notifications each time an event happens pertaining to one of your patients. Some examples of important events are: patient uploads a document, patient sends an SMS message, patient uploads a signature, you are assigned to a new patient, or you are CC’d on a patient. You will also receive a notification when a foundation opens where some of your patients are eligible. There is also a notification both for 60 and 30 days out from a program's expiration date.
To access Notifications, click on the “bell icon” in the top right-hand corner of the screen. This will reveal a dropdown with all of the notifications. Each notification provides a link back to the relevant patient case file.
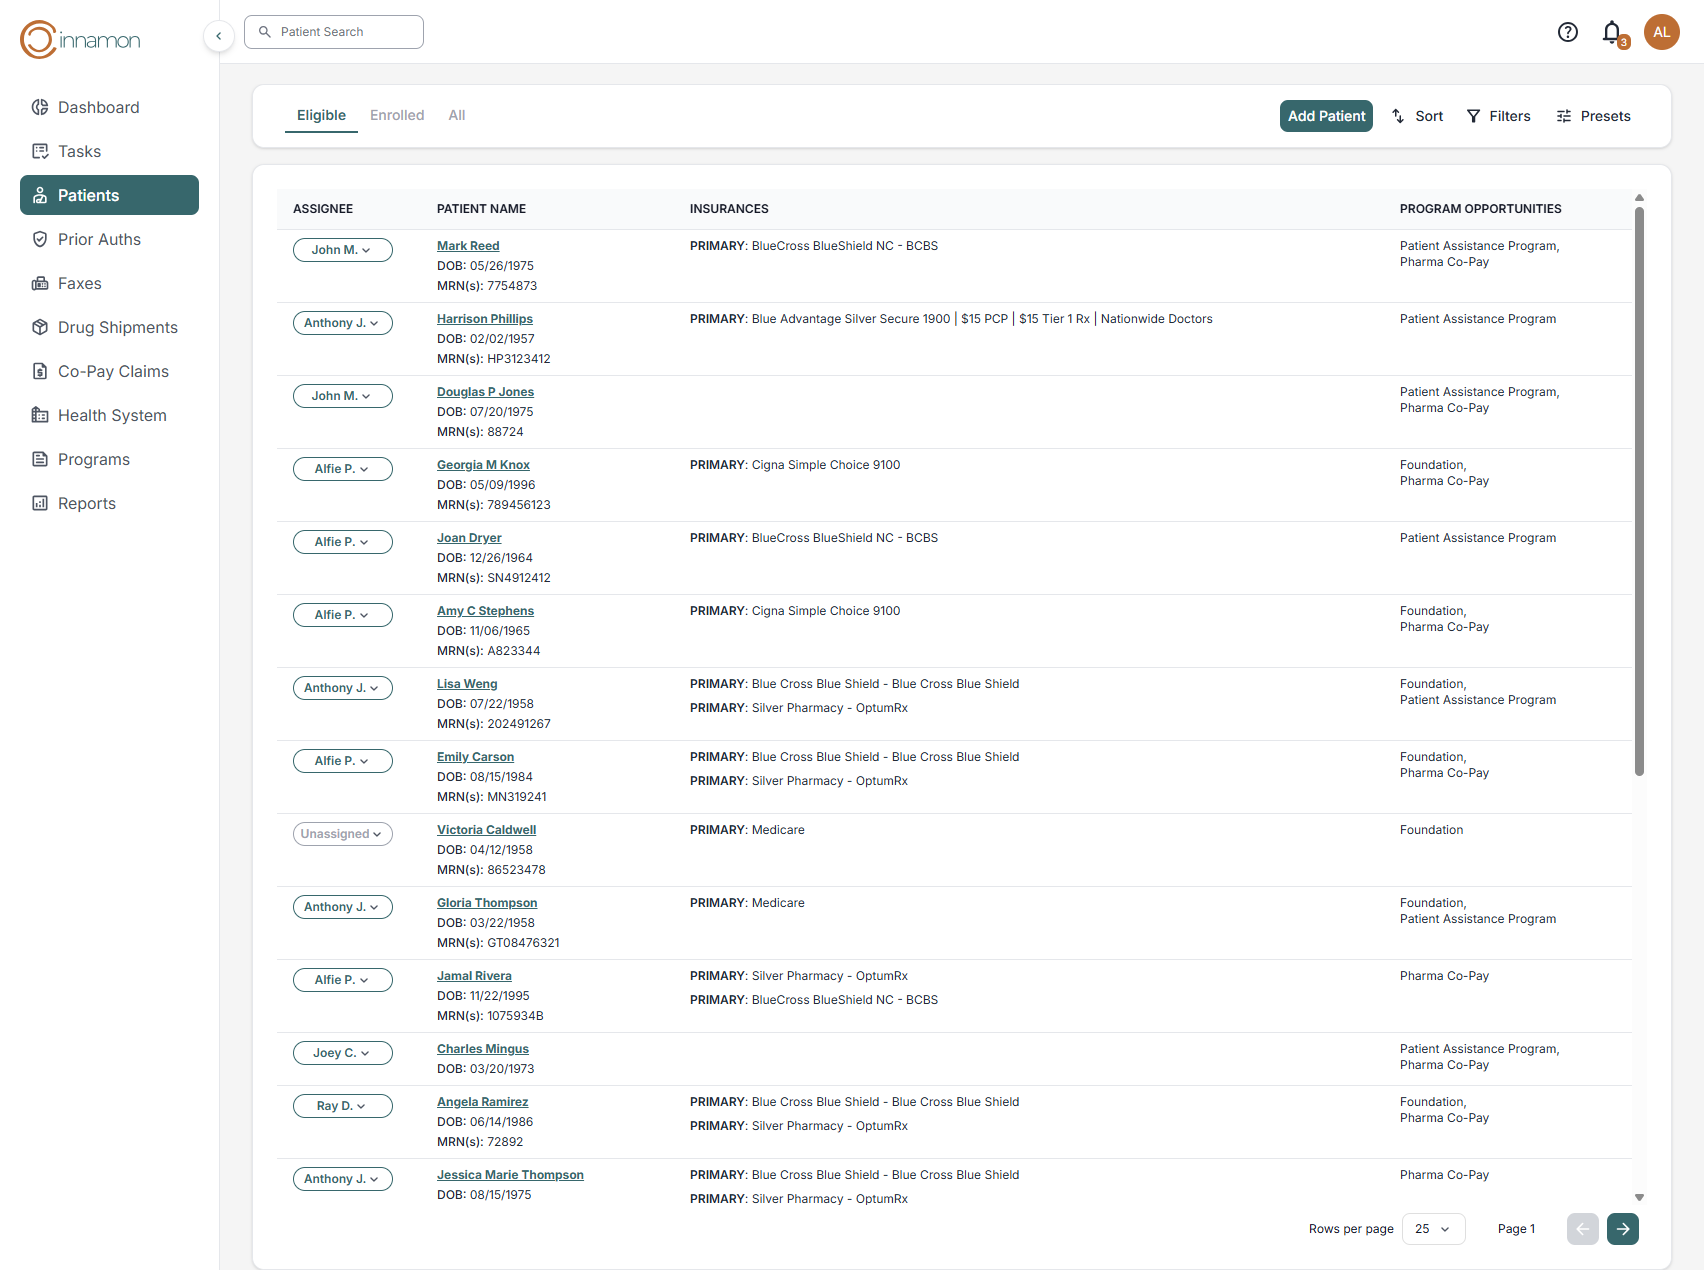
Patients
The Patients dashboard from the side bar menu is organized into three sections: Eligible, Enrolled, and All. The Eligible table lists all visible patients on the worklist, who may qualify for a program opportunity, with key details including insurance information, upcoming appointments and active programs. The Enrolled table displays patients who have been accepted into a program, showing details about the program, enrollment, and expiration date.
Patient Search
To search for a patient, advocates can click the Search box in the upper left of the screen. You can search by name or by MRN.
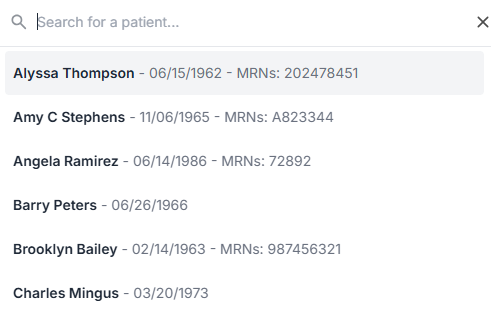
Advocates can use Ctrl + K (Windows) or Cmd+K (Mac) to quickly find a specific patient.
Patient Creation
Now let's talk about patient creation.
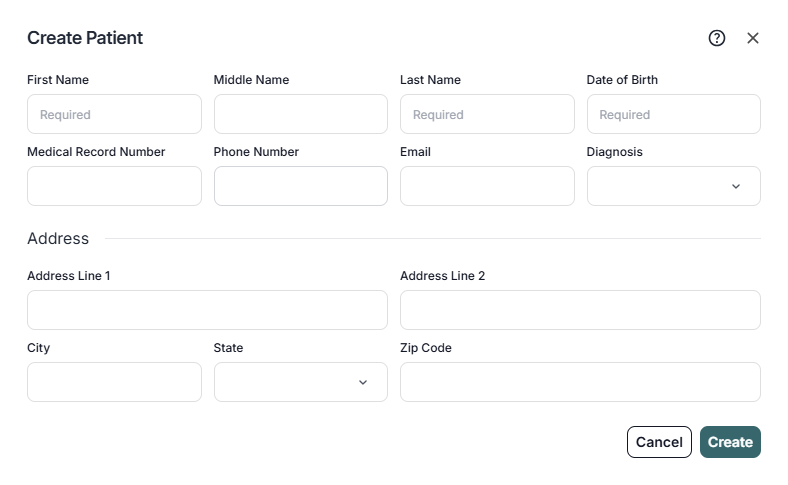
Cinnamon connects with the EHR through a real-time connection. When health systems have a real-time connection enabled, patients will automatically populate in the Eligible worklist. If your health system is still implementing the connection, you can add a patient manually by clicking on the “Tasks” or “Patients” tabs, and clicking on the “Add Patient” button.

When you click on the “Add Patient” button, a modal window will open up where you can enter the patient’s name and demographic information. Make sure to enter the correct MRN so Cinnamon can synchronize properly with the EHR.
Patient Overview
Once a patient has been created or selected, you will arrive at the Patient Overview page. From here, you can manage the patient’s tasks, status, demographics, insurances, programs, encounters, drug shipments, and notes.
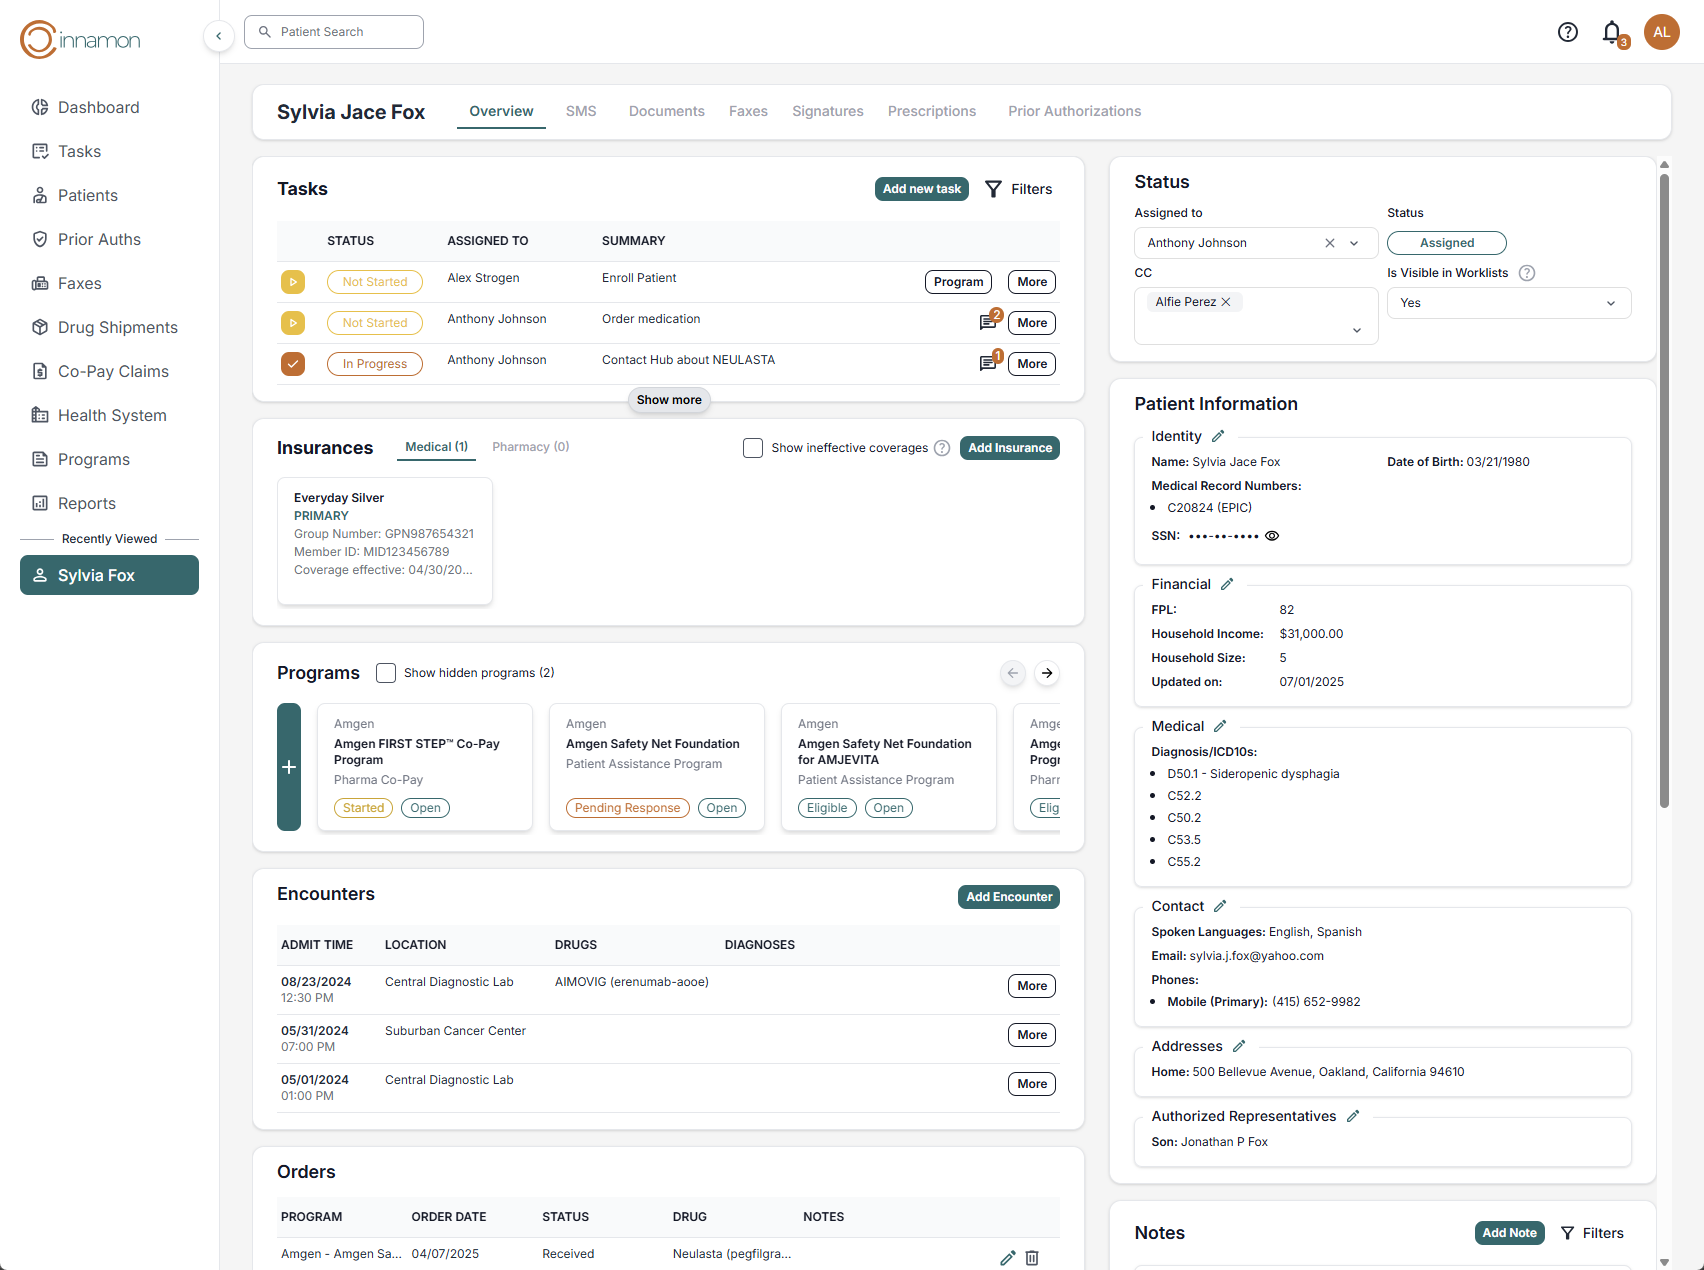
Patient Overview: Tasks
The Tasks section of the patient overview page allows you to quickly see this patient’s most relevant tasks. You can change the status of a task by clicking the status icon on the left. This will cycle through the three status options. If the task is tied to a program, you can select the “program” button for more details. You can also select “more” for the complete task description.
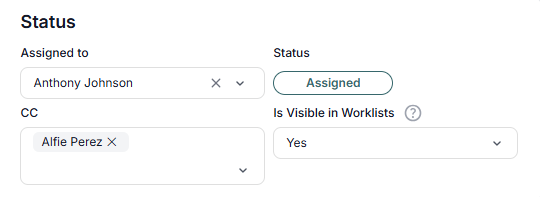
Patient Overview: Status
The Status section allows the advocate to determine who is assigned to the patient. “Assignment” is the process of assigning a patient advocate on your team to work that patient’s case file. When a patient enters Cinnamon, the assignment status is set to unassigned by default . Advocates can also CC other users to the patient profile. You can also toggle whether a patient will be shown in the worklists.
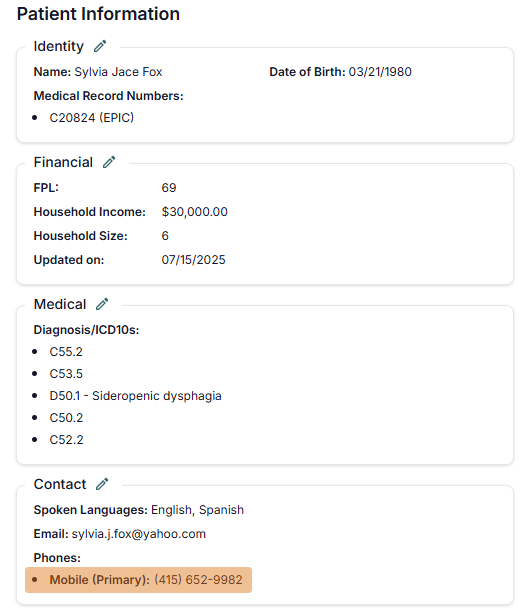
Patient Overview: Patient Information
The Patient Information panel houses all the patient’s demographic information including Identity, Financial, Medical, Contact, Addresses, and Authorized Representatives. Each of these can be easily added or edited. To change any details, simply click the pencil icon in the relevant subsection of the panel.
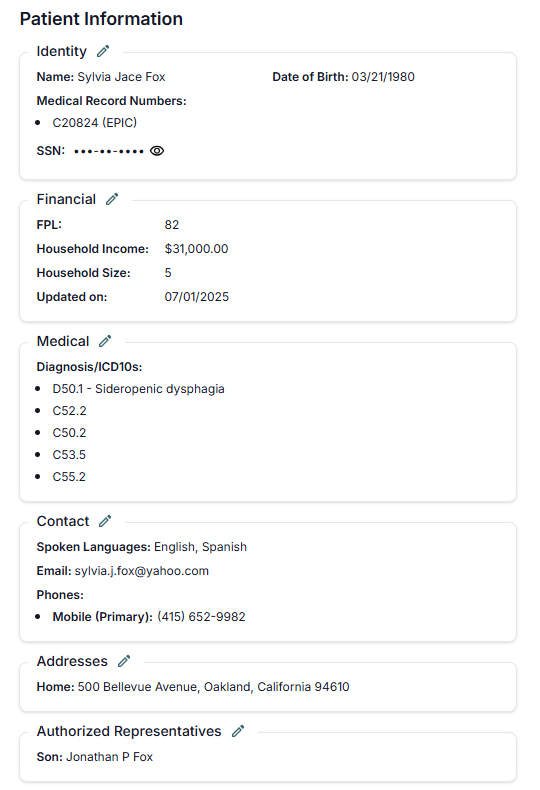
Identity:
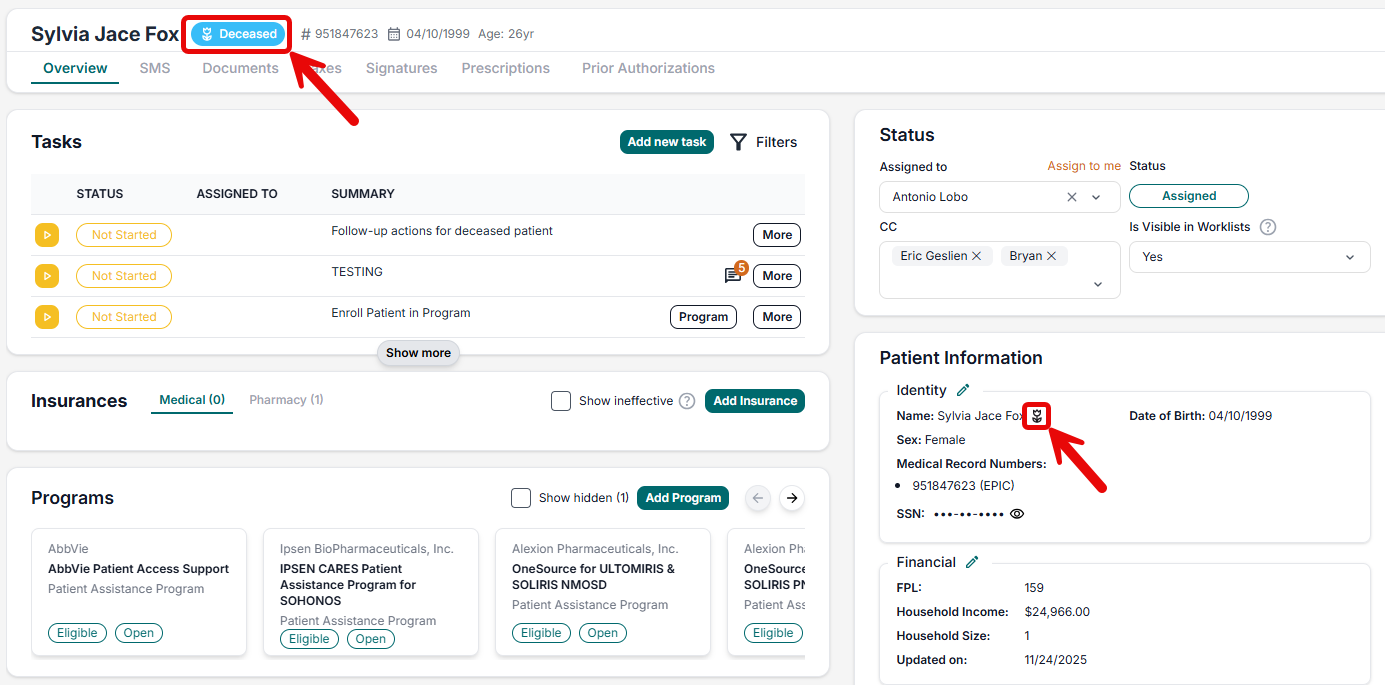
In the Identity section, users can store the follow information; First Name, Last Name, Middle Name, Name Suffix, Date of Birth, Sex, SSN, Deceased Status, and MRN.
When a user toggles the Deceased button, this is mark the patient profile as deceased and hide this patient from the eligible work list. Additionally, there is an option to auto create a task for follow-up actions (unenroll patient, destroy drugs, etc.)
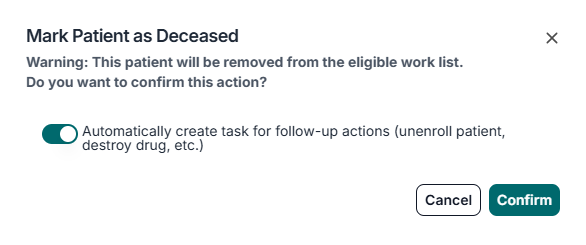
Please note: If a patient is marked Deceased, the patient profile will be marked in multiple locations to note the updated status as seen below.
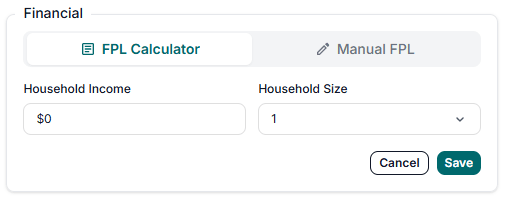
Financial:
In the Financial section, users can update FPL (Federal Poverty Level) information by using either the built in FPL Calculator or by entering the FPL manually.
Medical:
In the Medical section, users can add diagnosis information. To do this, click the “+” button and enter either the diagnosis or ICD-10 and click “Create”
If your health system is HL7 integrated, Cinnamon will automatically populate the provided information for you.
Patient Overview: Insurances
Below the tasks section, the Insurances panel displays both Medical and Pharmacy coverages. In this section, advocates can manage the patient’s insurances, adding, editing or deleting policies. To see expired insurance plans, click on the “Show ineffective coverages” checkbox.
To add a new insurance plan, click on the “Add Insurance” button. In the modal window, select either the “Medical” or “Pharmacy” tab depending on the type of insurance.
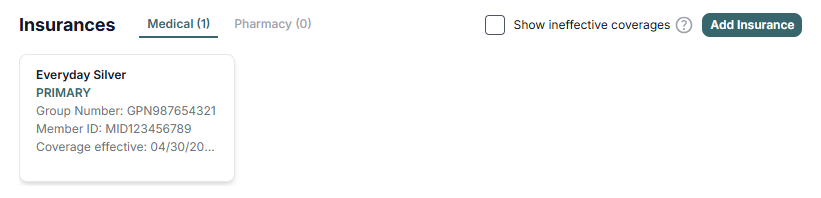
If your health system is HL7 integrated, Cinnamon will automatically populate the insurances for you.
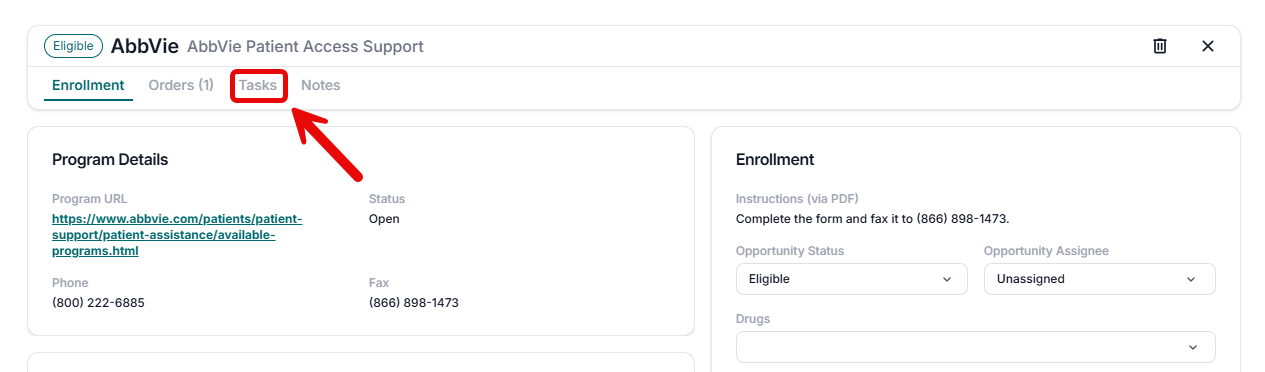
Patient Overview: Programs
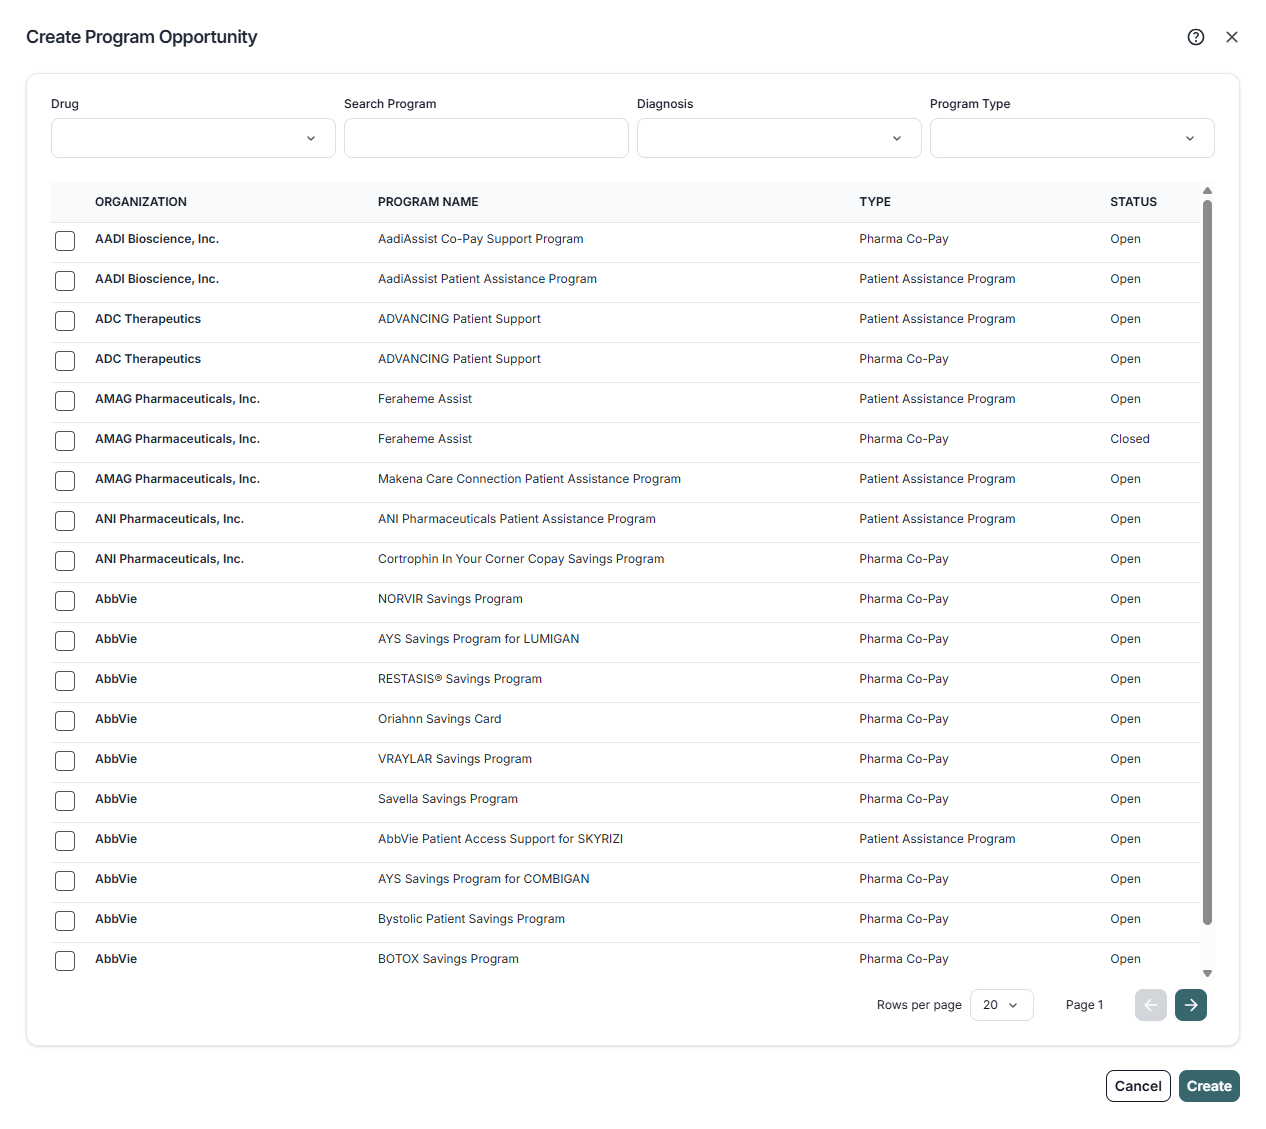
The Programs section, located below the insurances section, allows advocates to explore program opportunities.
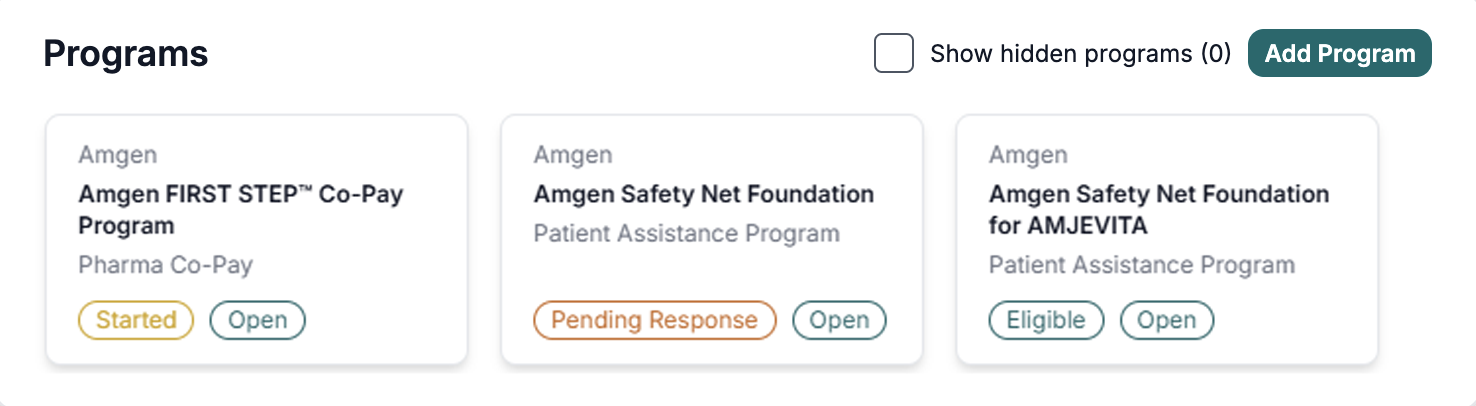
Clicking the “Add Program” button opens the “Create Program Opportunity window. This window allows you to efficiently search for programs using filters (Program Name, Program Type, Drug and Diagnoses) to quickly find and associate the right program with the patient case.
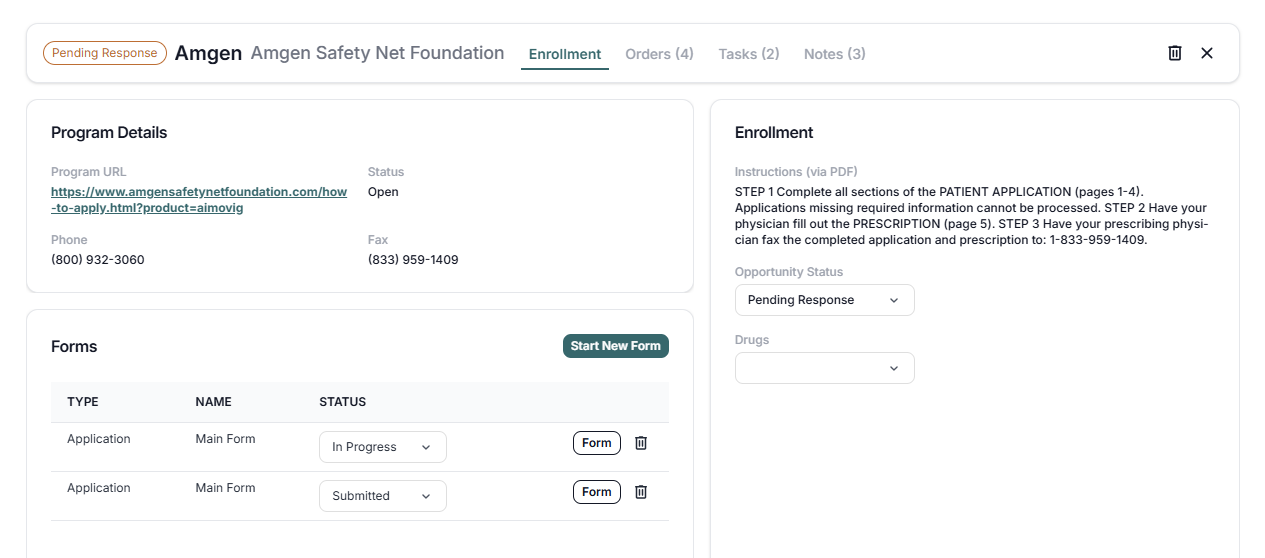
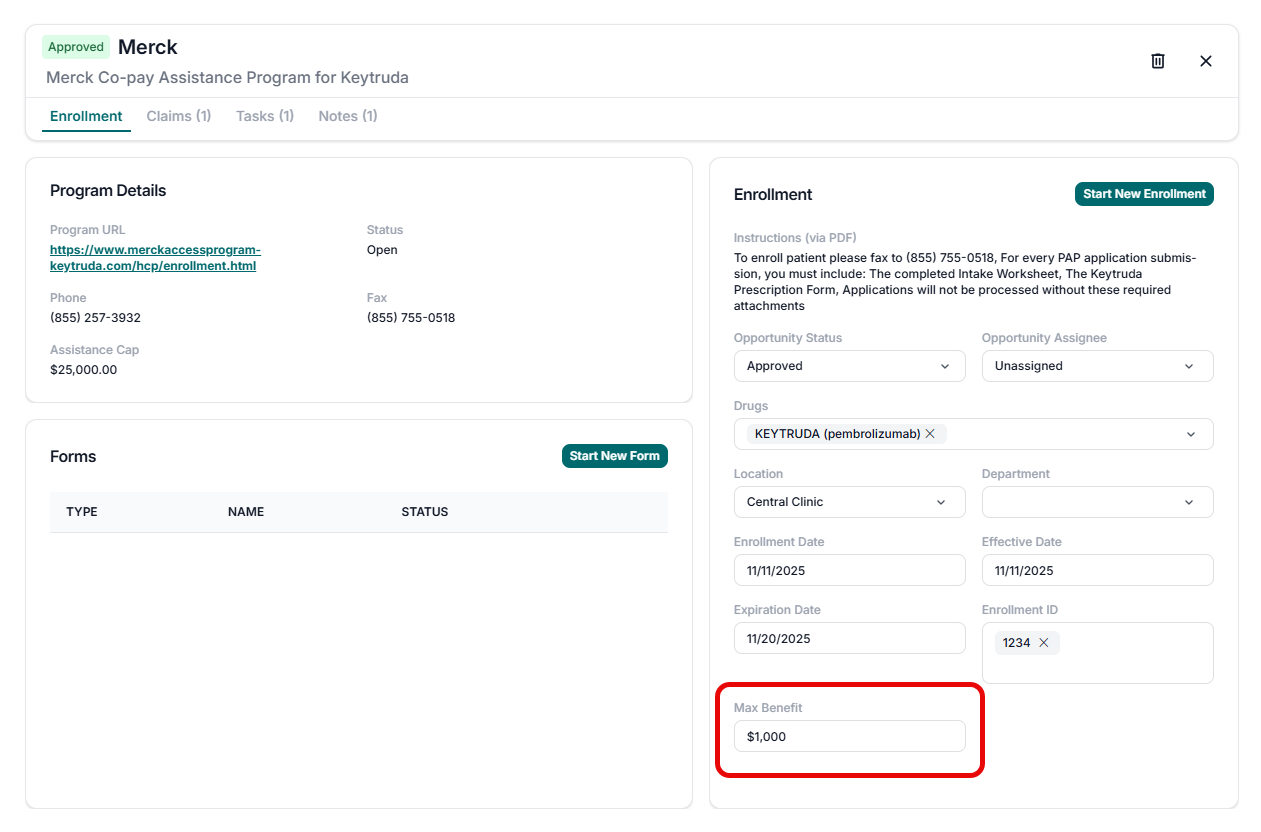
After adding a program, advocates can click on the card to start the enrollment process. In the Enrollment tab, advocates can start a new application or continue with previous applications. By selecting “Start New Form”, Cinnamon will open the application form where the user can insert patient information and add or request the signatures needed in the form. Advocates can also add tasks and notes for that program as well as manage Co-pay claims or Orders for that program.
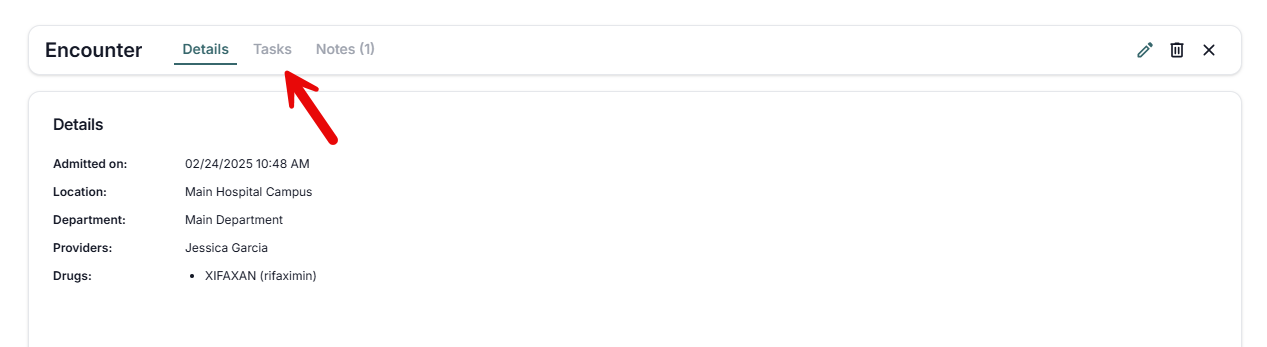
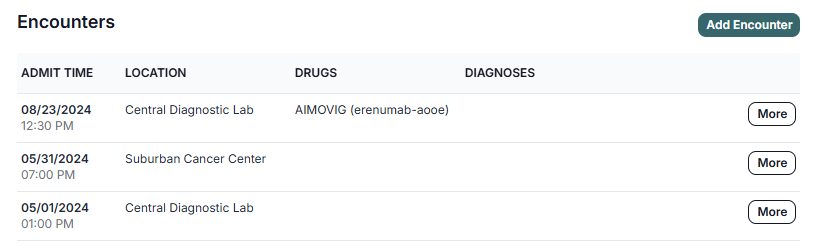
Patient Overview: Encounters
In the Encounters section, advocates can add encounters for the patient, check past encounter information and schedule future appointments. This section allows the user to link encounters to locations, physicians, prescriptions and diagnosis. Encounter also allows the user to link tasks and notes for that encounter after creating the encounter by clicking more to open the encounter window.
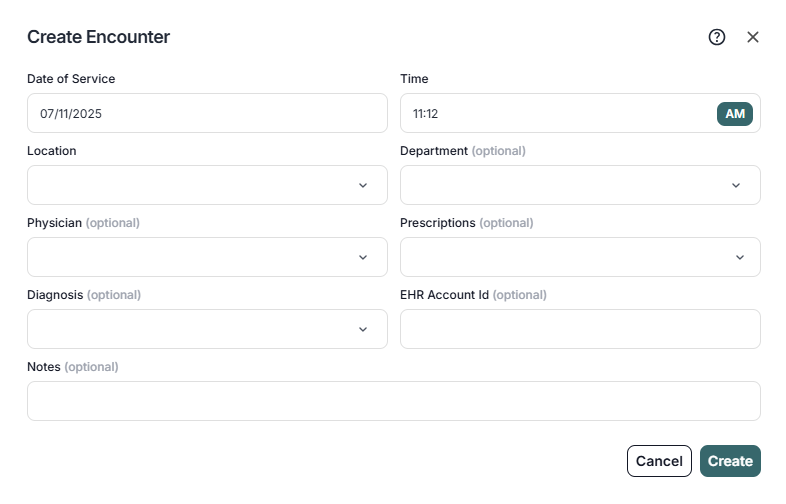
To add a new encounter, click the “Add Encounter” button. From here, the advocate can add the date of service, time, and location. Optionally, the user can add the department, physician, prescriptions, diagnosis, EHR account ID, and notes.
Patient Overview: Orders
Below Encounters, advocates will find the Orders section. A drug ordered via a Patient Assistance program will be displayed here. When the order is marked as received it then becomes a drug shipment.

Patient Overview: Drug Shipments
In the Drug Shipments section, advocates can record drug shipments. First, the patient must be associated with a PAP (Patient Assistance Program) or a patient must have already received a prior drug shipment. The Drug Shipments section will display when the requirements have been met.

Patient Overview: Notes
The patient Notes section, located below the patient information panel, are for memorializing important events that occur throughout the patient’s journey at the health system. Notes can be created in the patient case file in three different places.
- The first place is globally at the patient level
- The second place is in the encounter.
- The third place is in the program enrollment.
Some organizations recommend that patient advocates add a category to each note. Notes are time stamped and can be filtered based on whether or not a note is “starred” and also by Note Category.
When viewing notes, if a note is associated with a Program enrollment, a “Program” button will appear in the bottom right-hand corner of the note with a link back to the relevant enrollment. If a note is associated with an encounter, an “Encounter” button will appear at the bottom right-hand corner of the note with a link back to the relevant encounter.
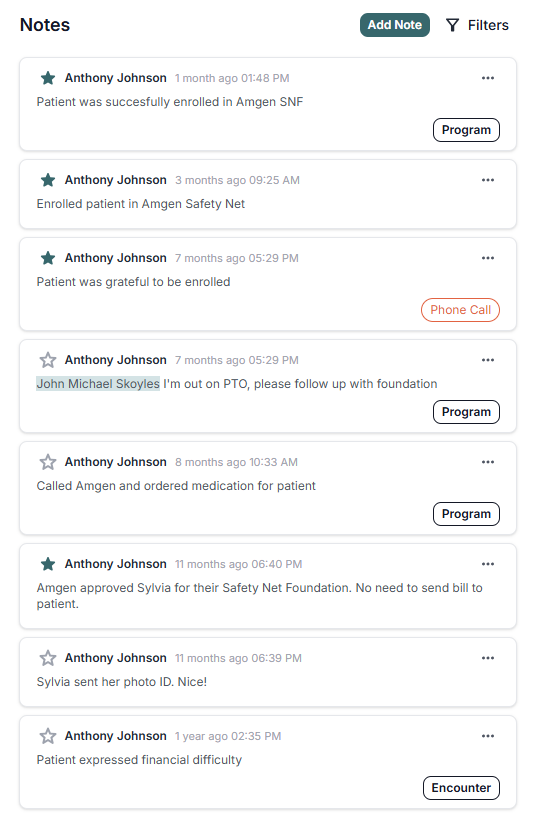
In the Health System tab, Cinnamon has a feature called “Note Categories” which lets you create categories to further characterize your notes. Some examples of note categories are “In-Person” or “Phone Call.” Your administrator can also create additional note categories for your team to use.
Patient SMS
In each patient case file, you have the ability to send and receive SMS communication with the patient, located on the SMS tab.
To enable this capability, check the contact section of the patient’s case file and ensure that a mobile phone number has been added for the patient. Typically, this is retrieved automatically from the EHR. To add a number manually, click on this pencil icon, which will open a modal window where you can enter the patient’s phone number.
Once the patient’s phone number has been created, you can click on the SMS tab which will show the full communication history of the patient. This opens up the opportunity to send requests for patients to securely upload documents or signatures.
![]()
Patient Documents
Each patient case file has a Documents tab, which allows you to manage documents relevant to the patient’s financial journey.
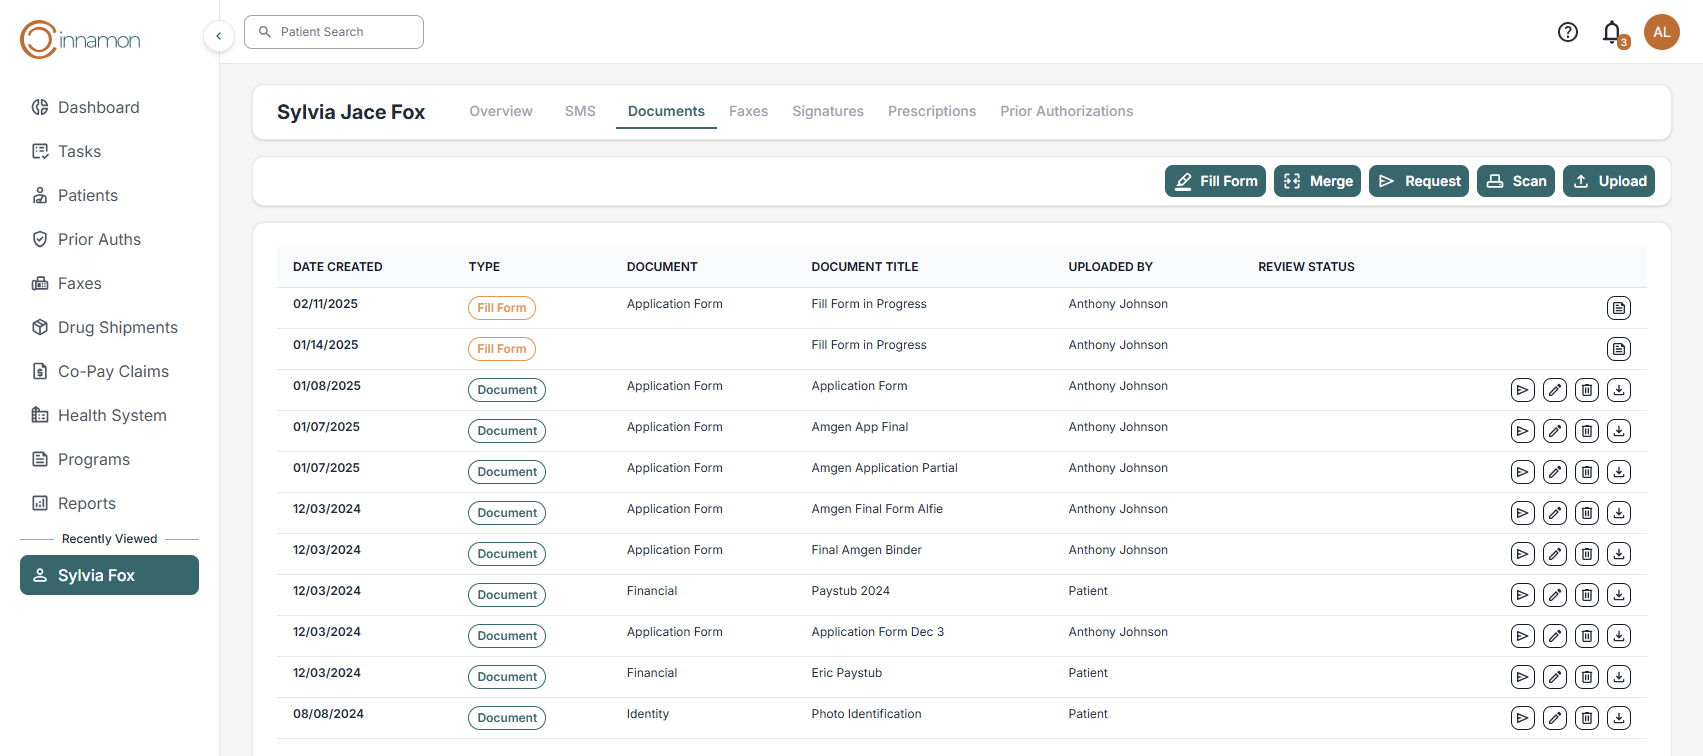
To request a document from the patient via mobile phone, click on the “Request” button, which will open a modal window called “Request Patient Documents.” The most common document requests are pay stubs, tax returns, and denial letters. Many financial assistance programs require proof of income to qualify patients.
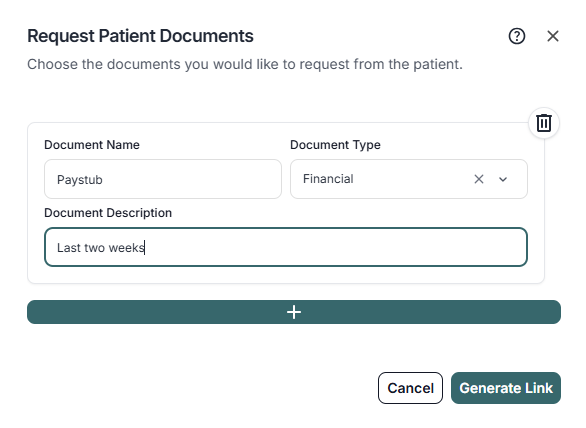
You can generate a secure link, which you can send to the patient via email, or directly to their mobile phone, which is what we recommend. When the patient receives the link, they can click on the link and see the health system logo. After a brief authentication step, the patient can securely upload the document.
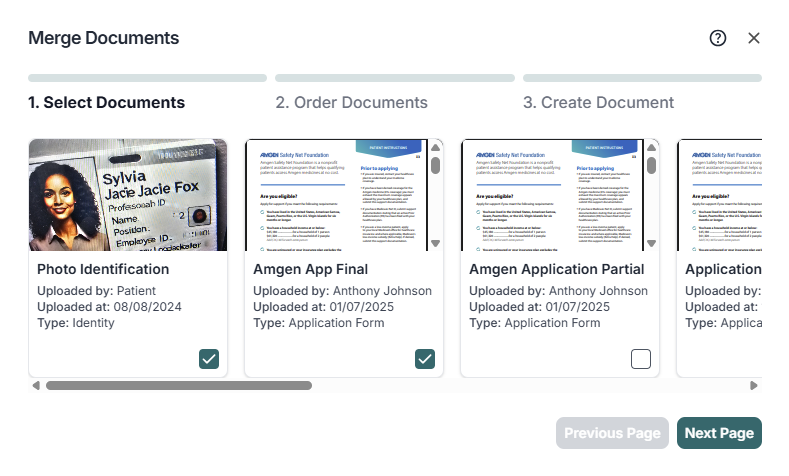
To merge documents together, click on the merge button. Select the documents you would like to merge and reorder them however you’d like. Then, combine them into a new document.
All data within Cinnamon is encrypted at rest and stored in accordance with SOC II Type II.
If the patient provides a document to you in person, you can scan the document using our scan feature. If the patient emails you a document, you can download the document to your PC, then upload it to Cinnamon.
Patient Faxes
You can send a fax from each patient case file by clicking into the case file, and going to the Faxes tab. Any document that lives in the patient's documents container can be faxed. If you need to combine documents into a single PDF, go to the documents container and use the Merge button.
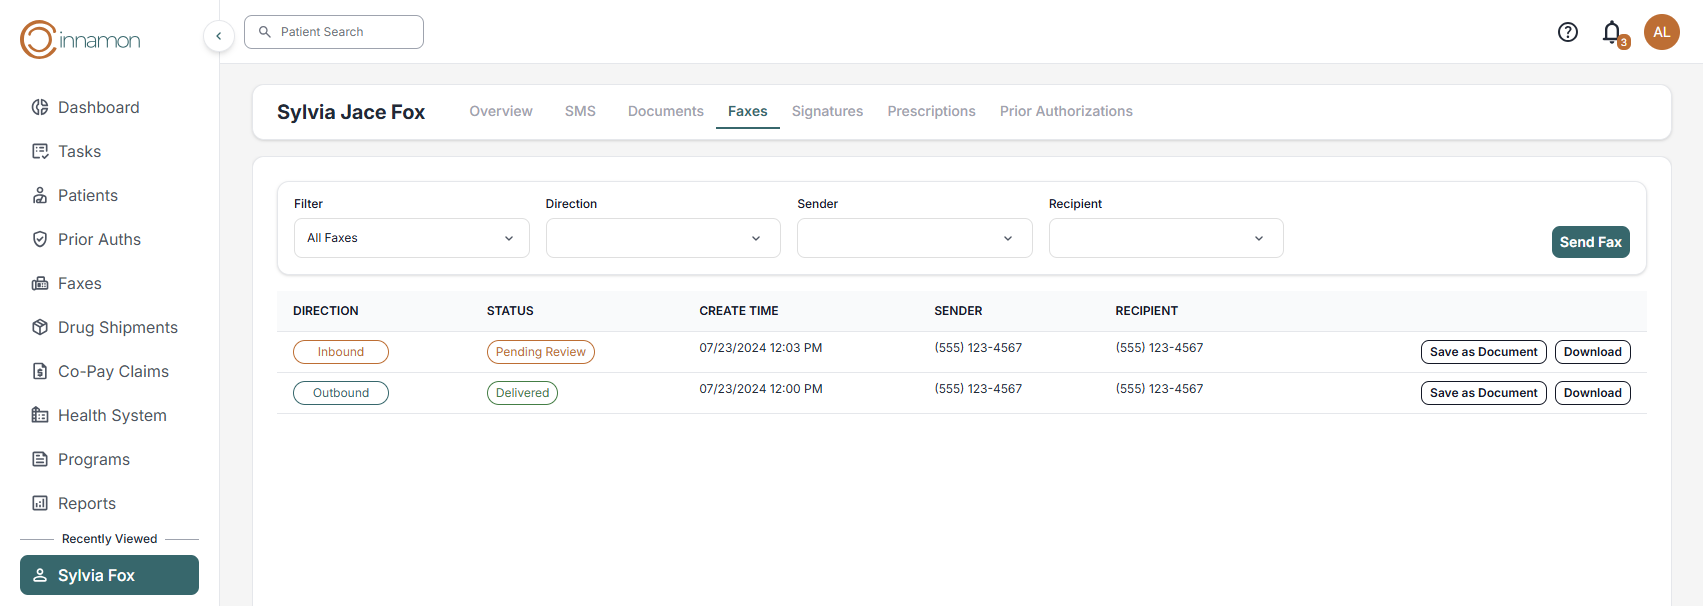
To send a fax, click on the “Send Fax” button. Make sure that the correct fax number is selected from the drop down menu. If you need to enter a fax number, you can do so in the text input. Then, select the document you would like to fax.

After hitting the “Send” button, Cinnamon will initiate the fax. An entry will appear in the fax log with the status “Pending.” It takes approximately 2 minutes to send a fax. After the fax has been confirmed by the recipient, we will update the status to “Delivered.”
Inbound faxes land in the “Faxes” tab. You must associate each inbound fax with the correct patient. Once the fax has been associated with the correct patient, you will find the fax in the patient’s case file.
Cinnamon provides a clear audit trail of all faxes sent and received on behalf of the patient.
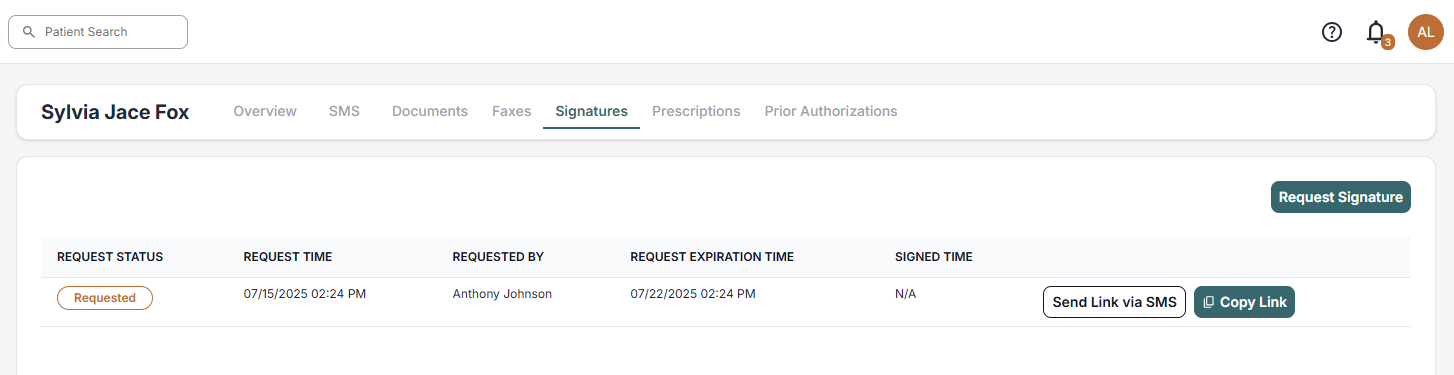
Patient Signatures
In the Signatures tab, advocates can request the patient’s signature to complete enrollment forms, ensuring the patient can be accepted into the programs they are eligible for, allowing access to necessary medications.
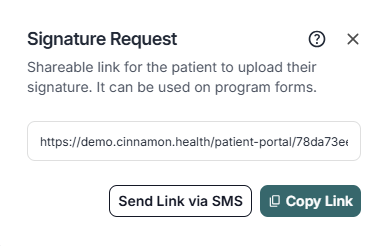
If you would like to acquire a new signature, simple click the “Request Signature” button. This will generate a link that can be sent directly to the patient via SMS or by email. After a brief authentication step, the patient can sign using their phone.
To manage these requests, we’ve created a comprehensive table. Each row includes two buttons: one for sending the signature request link via SMS and another for copying the link directly. Additionally, the table displays important details such as the request status, request time, the advocate who initiated the request, expiration date, and the date the signature was signed. This organized approach makes it easy for advocates to track and manage signature requests.
Patient Prescriptions
Cinnamon receives medication orders from the EHR. Each time a patient receives a medication where access and affordability are likely to be an issue, Cinnamon will flag the prescription in the Prescriptions tab.
Clicking on the Prescriptions tab will give you a summary of the medications the patient has been prescribed. To facilitate prescription management, we’ve created a comprehensive table. High cost drugs are marked for easy identification, helping advocates quickly spot high-cost medications. This organized approach ensures that all prescription details are readily accessible and that advocates can efficiently manage patient care.
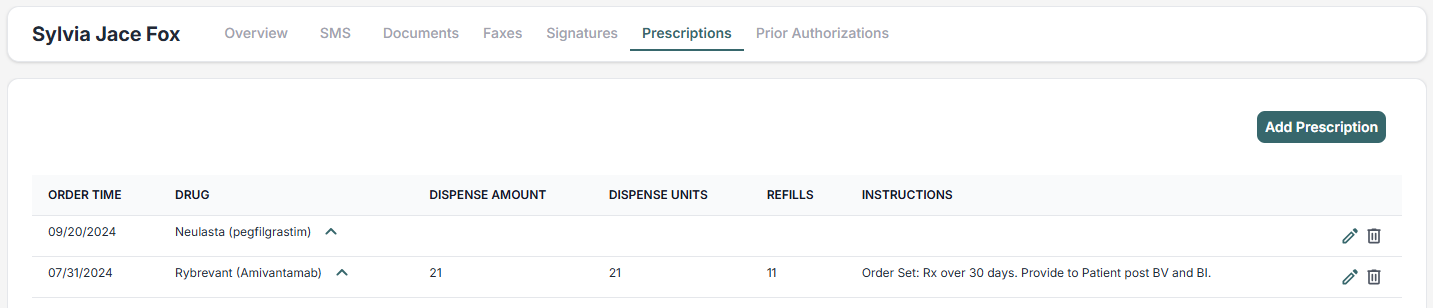
To add a new prescription, click on the “Add Prescription” button. Advocates can include essential details such as the order time, drug name, dispense amount, unit, refill instructions, and additional descriptions.
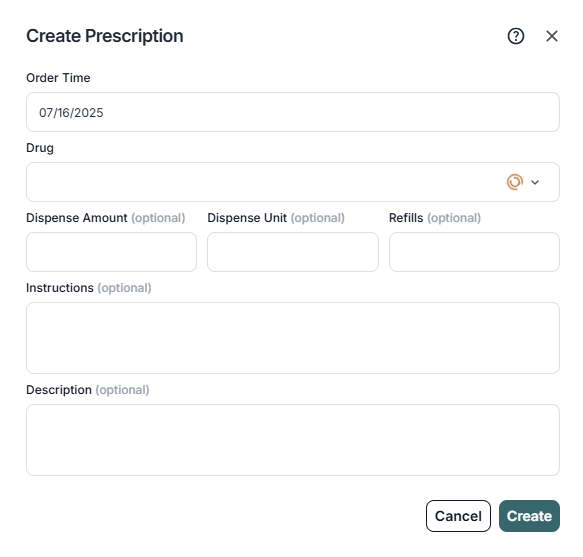
Only the “Order Time” and “Drug” are required to create the prescription.
Once the prescription has been created, Cinnamon will search for the best foundations, co-pay assistance, and patient assistance programs for the patient, depending on their insurance and FPL.
Faxes
In the Faxes dashboard of the sidebar menu, you can send faxes or review both inbound and outbound faxes. When viewing a patient section, you can access the Faxes tab to send and view faxes related to that patient.

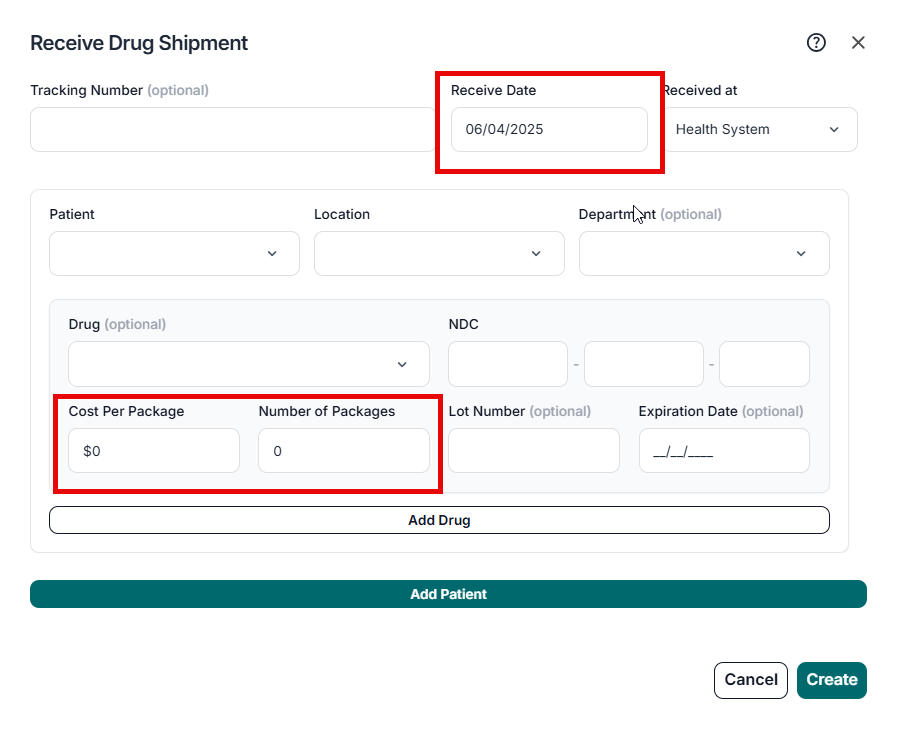
Drug Shipments
In the Drug Shipments dashboard, the user can check all drug shipments in the app, from the most recent to the oldest.
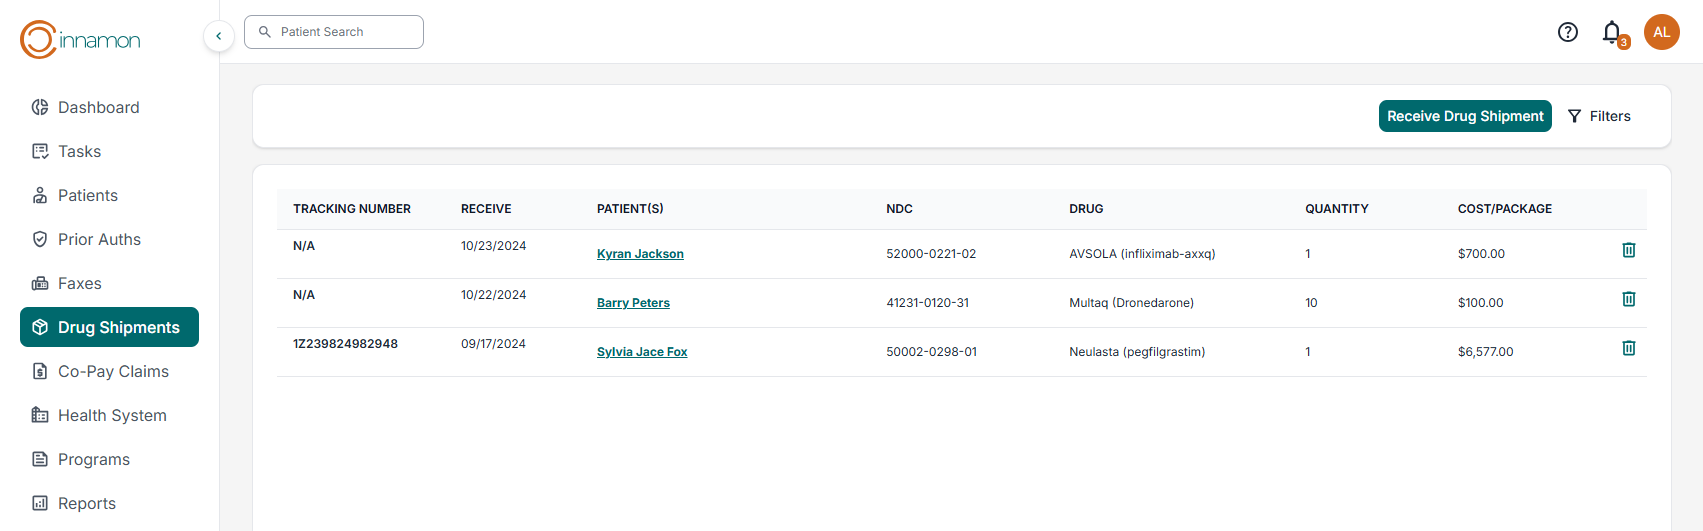
You can also click on the “Receive Drug Shipment” button to add bulk entries for the same tracking number and receive date. When the pop-up window appears, enter the details and then click Create at the bottom-right.
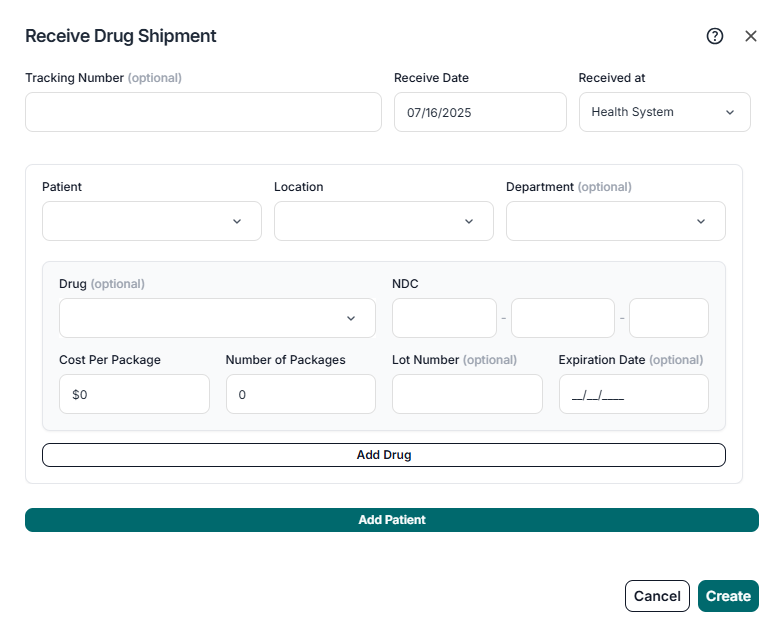
If you’re already in a Patient Case and want to add drug shipments, you must first associate a PAP (Patient Assistance Program) with the patient. Once the patient has a PAP, the Drug Shipments section will become available.
From there, you can create drug shipments similar to how it’s done in the sidebar, but since you’re already in the patient’s profile, there’s no need to select the patient again.
Please note that bulk entry is not available when adding drug shipments directly from the patient’s profile.
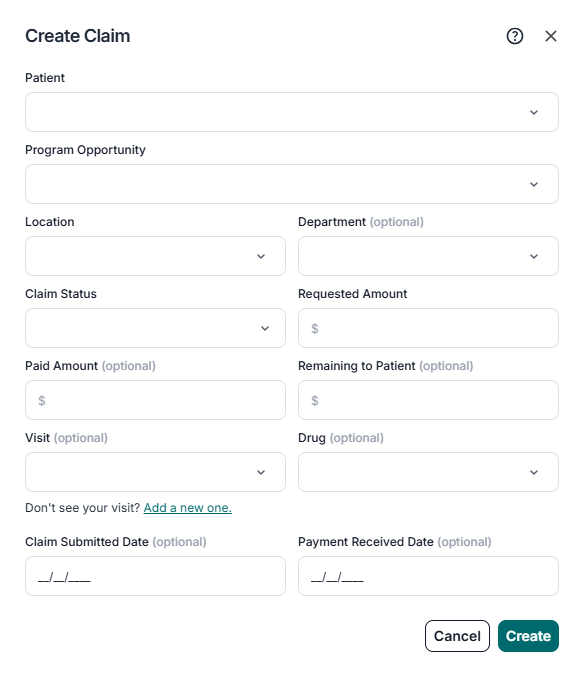
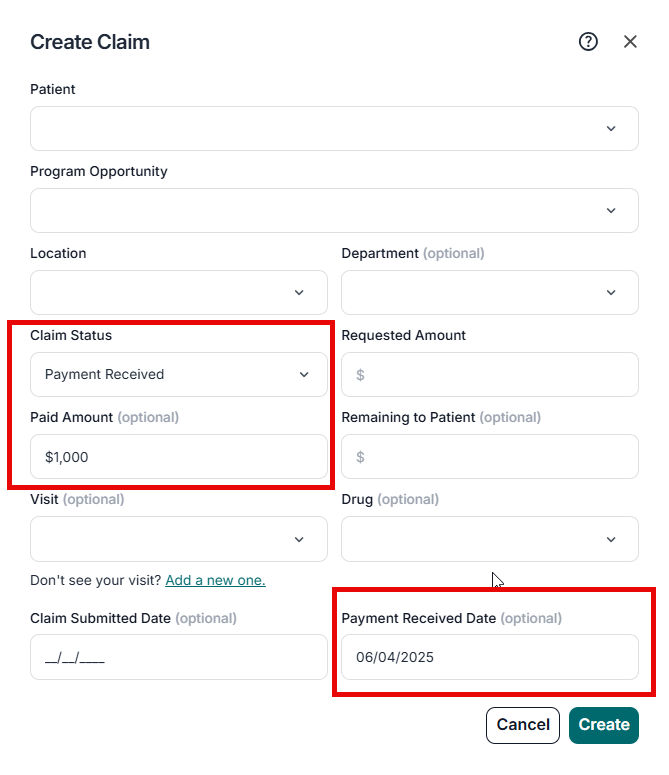
Co-Pay Claims
In the Co-Pay Claims dashboard, the user can visualize a table with all the claims in the app, with options to create, update, and delete a Claim.
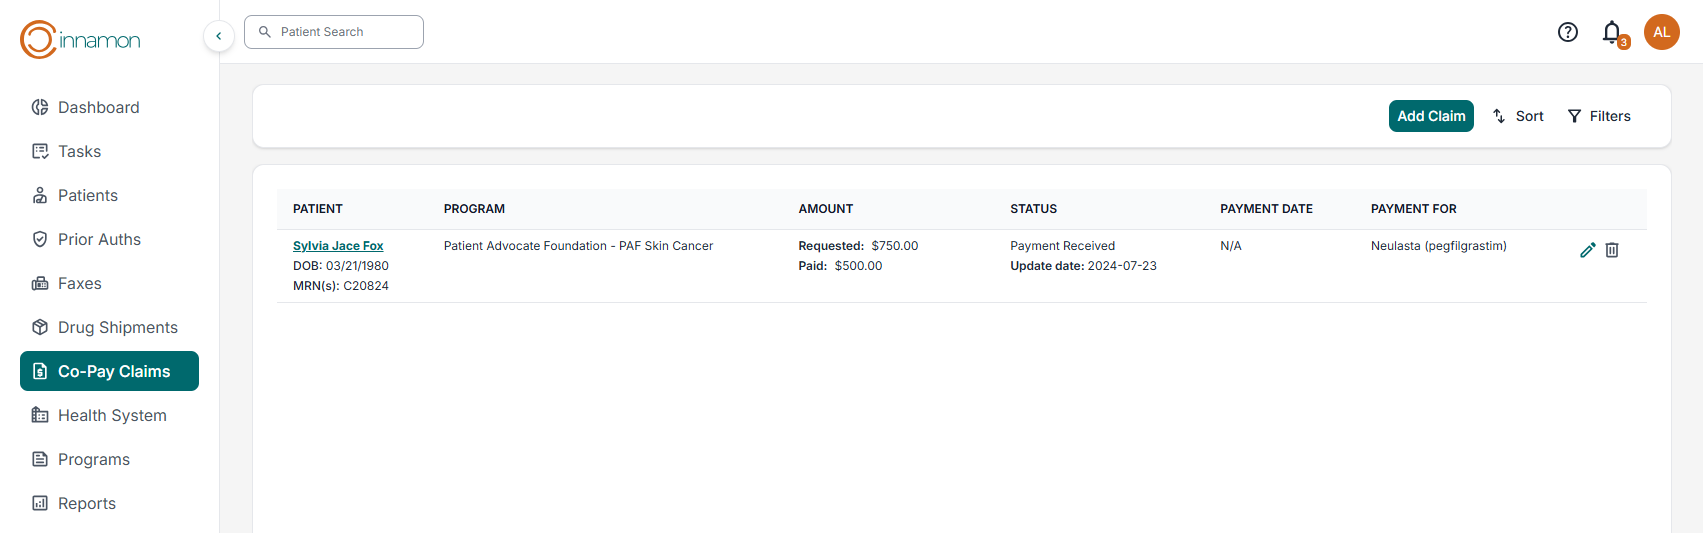
To create a Claim, on the top right corner there is a button that will open a form to be filled out. Patients must have a Program Opportunity like Co-pay or foundation to associate the Claim with. Update a Claim by clicking on the Pencil icon on the right side of the table, next to the Delete button (trash icon).
Health System
In the Health System dashboard, located in the sidebar menu, you have comprehensive control over several key sections:
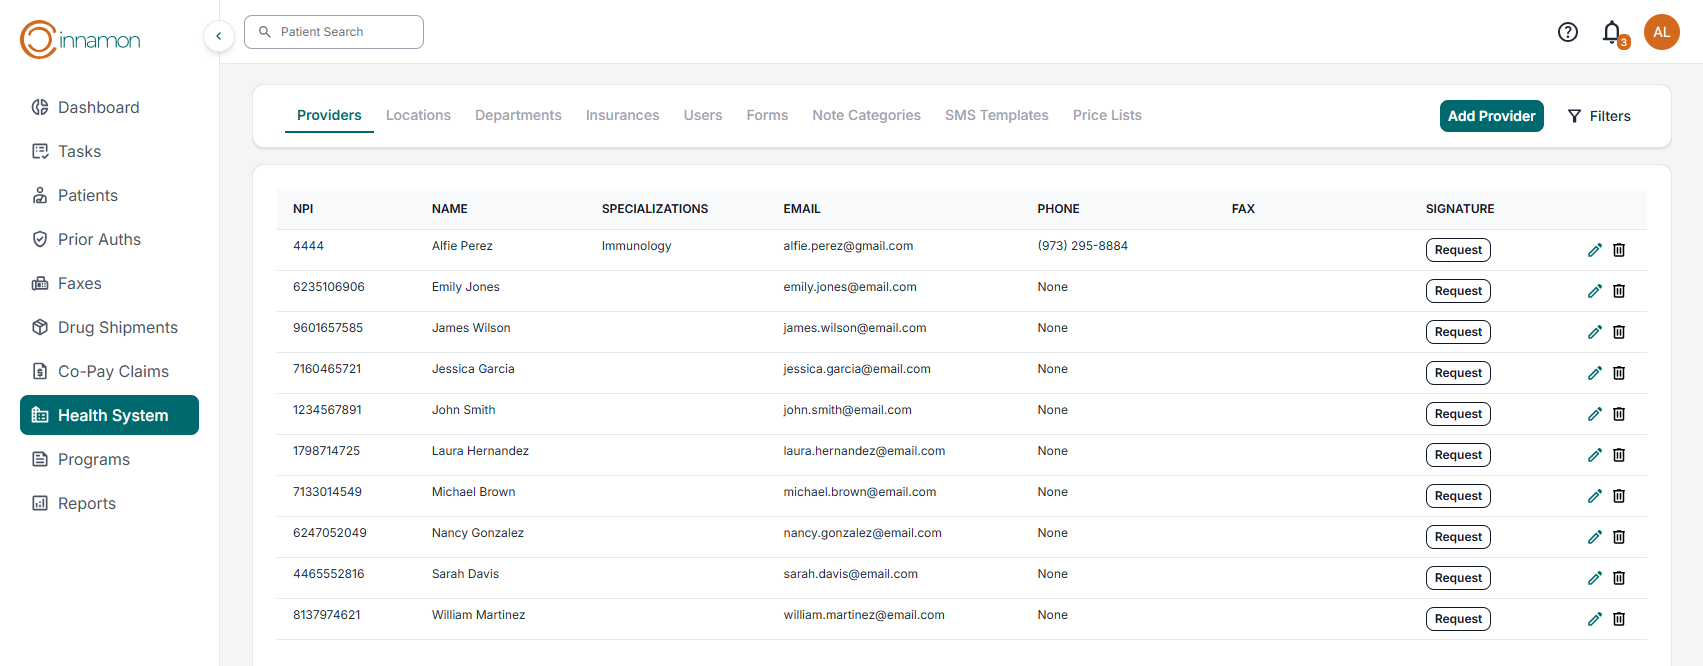
- Providers: advocates can add, edit, delete, and search for providers. Additionally, you have the option to request signatures from providers.
- Locations: here you can add new locations, edit existing ones, and perform location searches to manage all physical sites associated with the Health System.
- Departments: add departments and associate them with specific locations, as well as edit and search for departments to maintain efficient organization.
- Insurances: where managers can add, delete and update insurances.
- Users: manage users permissions (pharmacy review and featured worklist).
- Forms: users can add custom health system form, edit or exclude existing ones and add placeholders for signatures in the document.
- Note Categories: this section displays all the note categories with the ability to edit or delete them.
- SMS Templates: managers can edit the default SMS message for different requests. (e.g. signatures and documents).
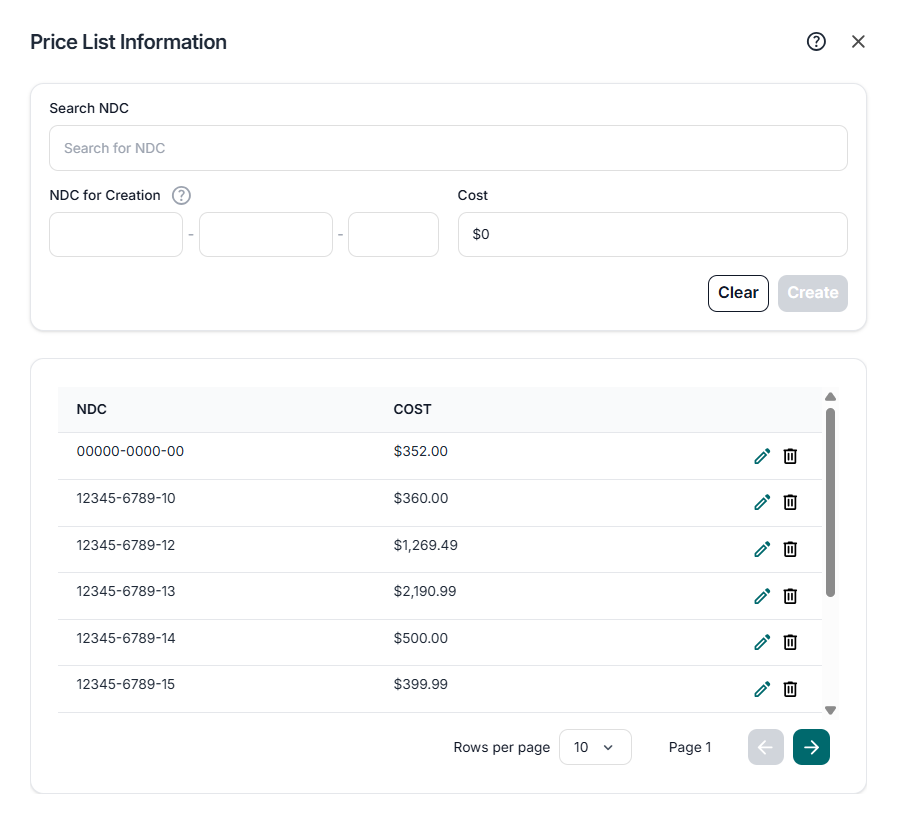
- Price List: allows managers to add a price list containing drug NDCs and prices. These prices will be suggested to other users when creating a drug shipment. For the prices to be suggested inside a drug shipment the price list must match the current year and quarter.
- To add a price list, click the “Add Price List” button in the top right of the screen.

Price List upload instructions:
- Upload your price list as an Excel (.xlsc) or CSV file
- Include only two columns with headers in the following order: “ndc” and “cost”
- Each NDC must be a unique 11-digit identifier (e.g., 00001-1111-22)
- Every NDC entry must have a corresponding cost value
- All costs must be numeric (e.g., 4000)
After adding the price list, users can click on the pencil icon to search, add, and update values.
Programs
The Programs dashboard, from the sidebar menu, allows advocates to search programs and check for the program's details. By clicking the “More” button, you can check the forms available for that program, drugs and diagnoses associated, and instructions for application.
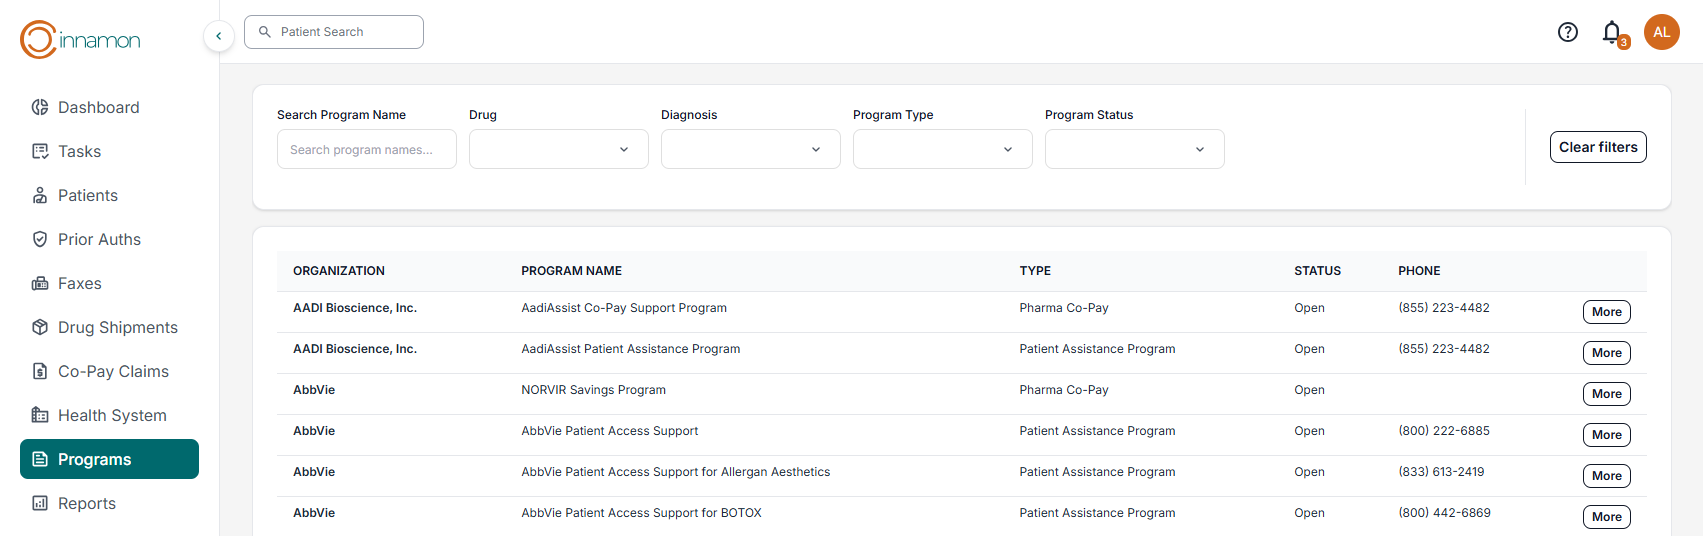
The search functionality allows you to filter programs based on the following criteria:
- Program Name: Search directly by the program’s name.
- Program Type: Filter programs by their type to narrow down your search.
- Program Status: Sort programs by their current status, such as active or inactive.
- Drug: Drugs associated with that program.
- Diagnoses: Diagnoses covered by the programs.
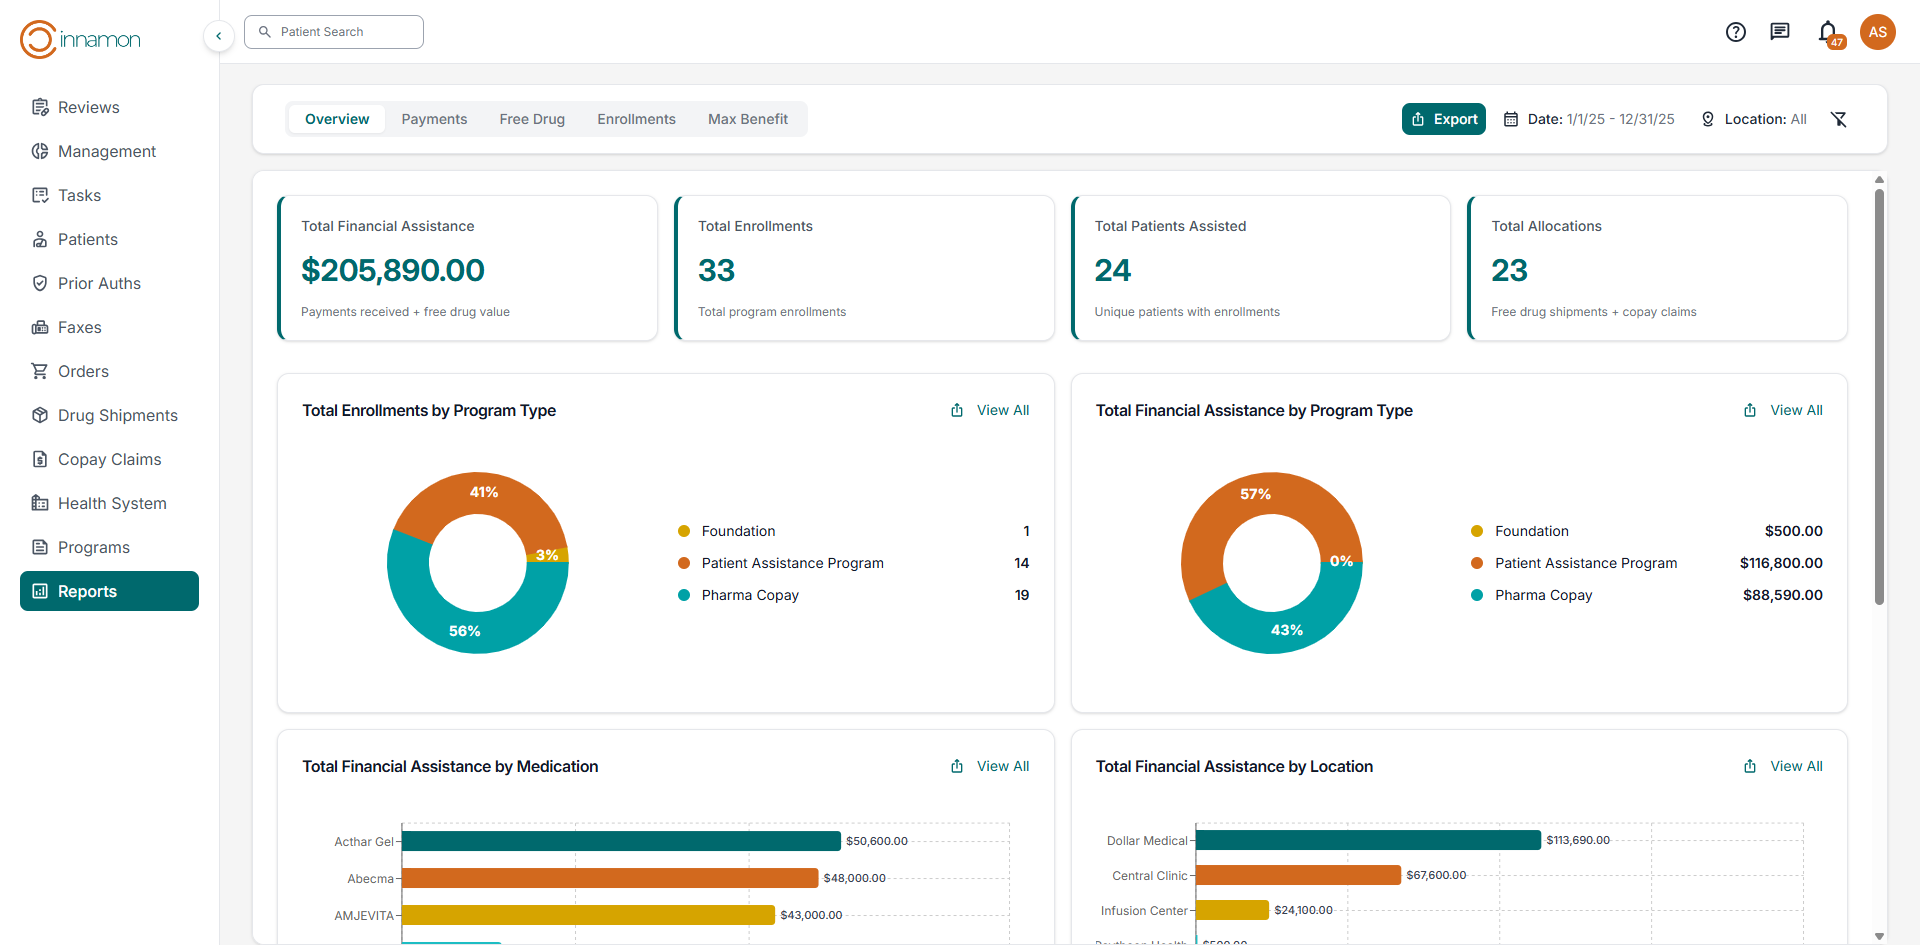
Reports
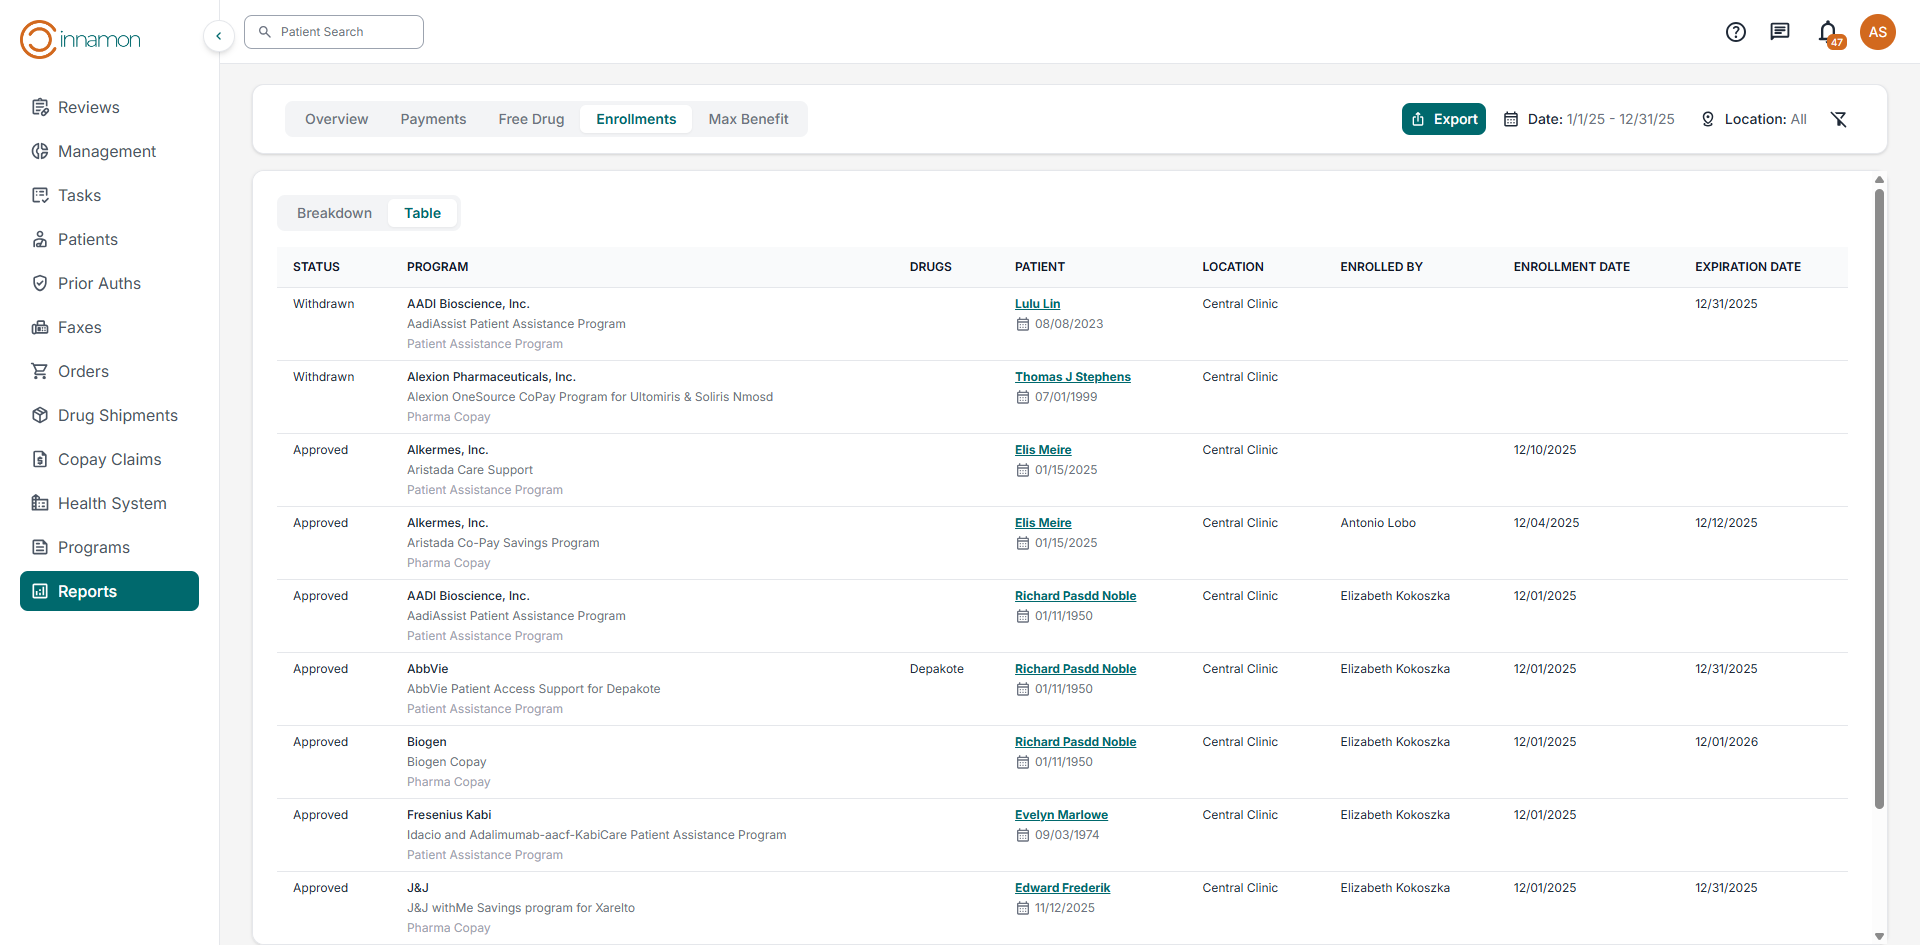
In the Reports dashboard, advocates have access to a comprehensive set of reports including an Overview, Payments, Free Drug, Enrollments, and Max Benefit report. Beyond the Overview report, each report includes a “breakdown” view as well as a “table” view. Reports can filtered by date as well as location. Each report can be exported locally by clicking the “Export” button.
Overview Report: This Overview report provides data visualization for the following:
- Total Financial Assistance
- Total Enrollments
- Total Patients Assisted
- Total Allocations
- Total Enrollments by Program Type
- Total Financial Assistance by Program Type
- Total Financial Assistance by Medication
- Total Financial Assistance by Location
- Total Number of Allocations by Program Type
- Total Number of Allocations Trending
Payments Report: The Payments report includes all claims with the status "Payment Received" and any value in the Paid field. The report date is determined by the Payment Received Date from the claim.
Free Drug Report: The Free Drug report tracks all drug shipments. This report uses the Receive Date as the report date, and the amount is calculated by multiplying the Cost per package by the Number of packages.
Enrollment Report: The Enrollments report includes all program opportunities with the Opportunity Status set to Approved, Denied, or Withdrawn. This report tracks the following fields: Status, Program (organization, program name, and program type), Patient, Location, Enrolled by, Enrollment Date, and Expiration Date.
Max Benefit Report: This report shows all assistance programs that are approved and have a value in the Assistance Cap field. It uses the Approval Date as the report date and is updated hourly.
Management Reporting Guide
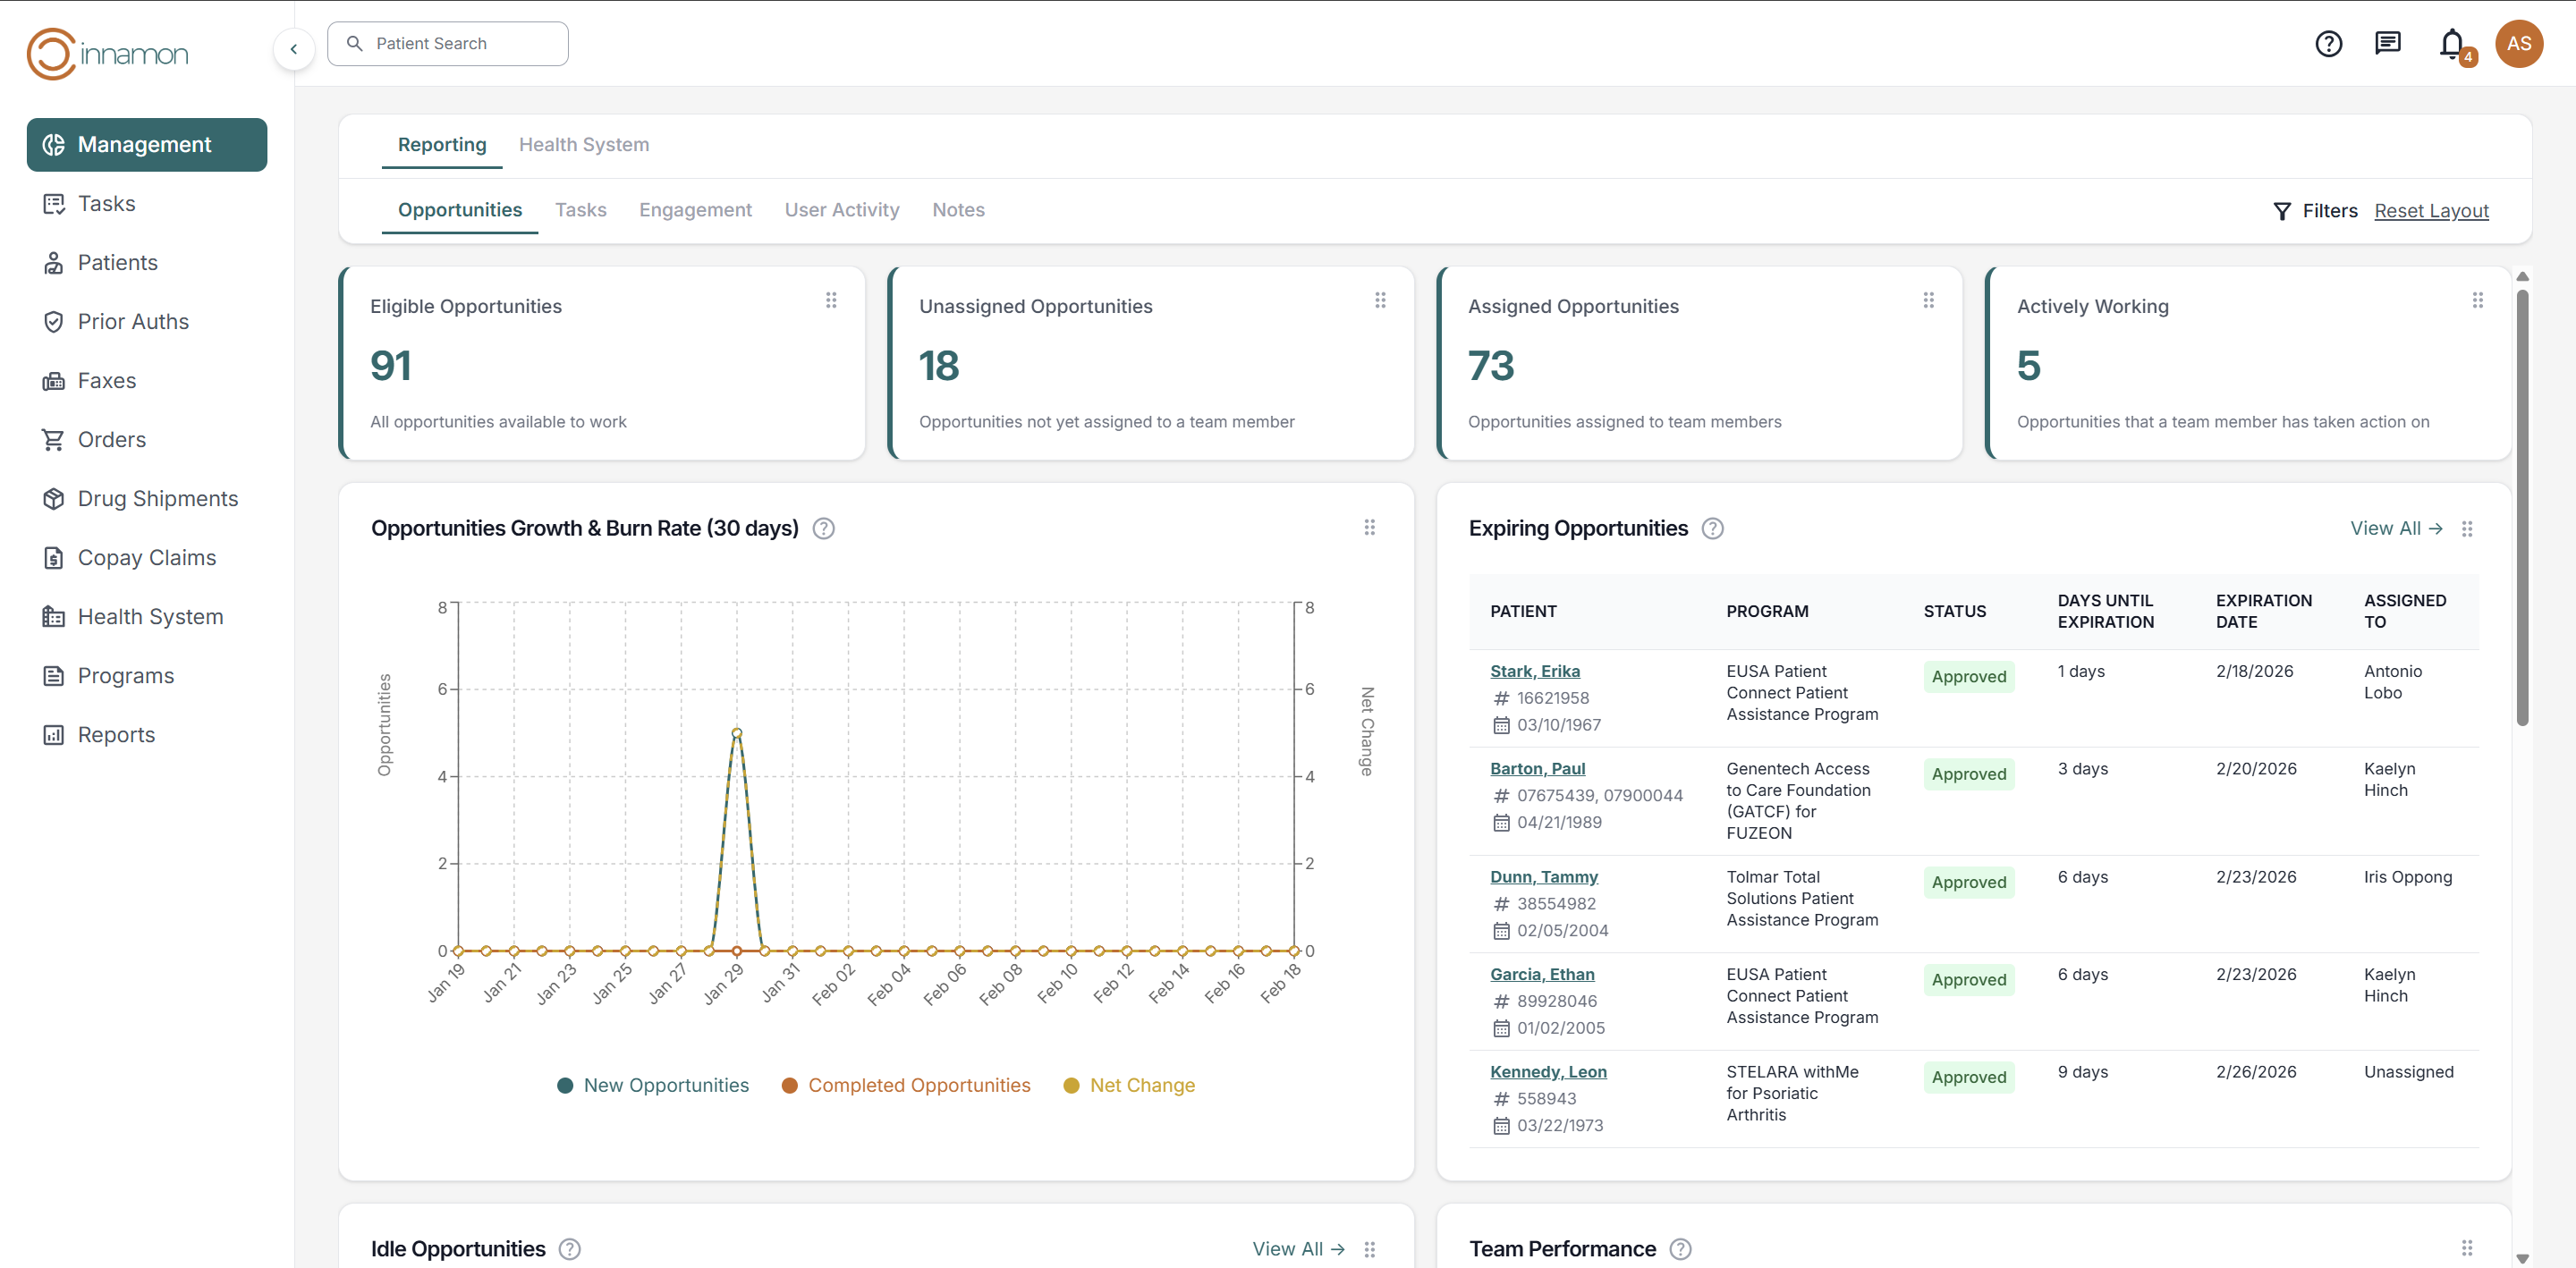
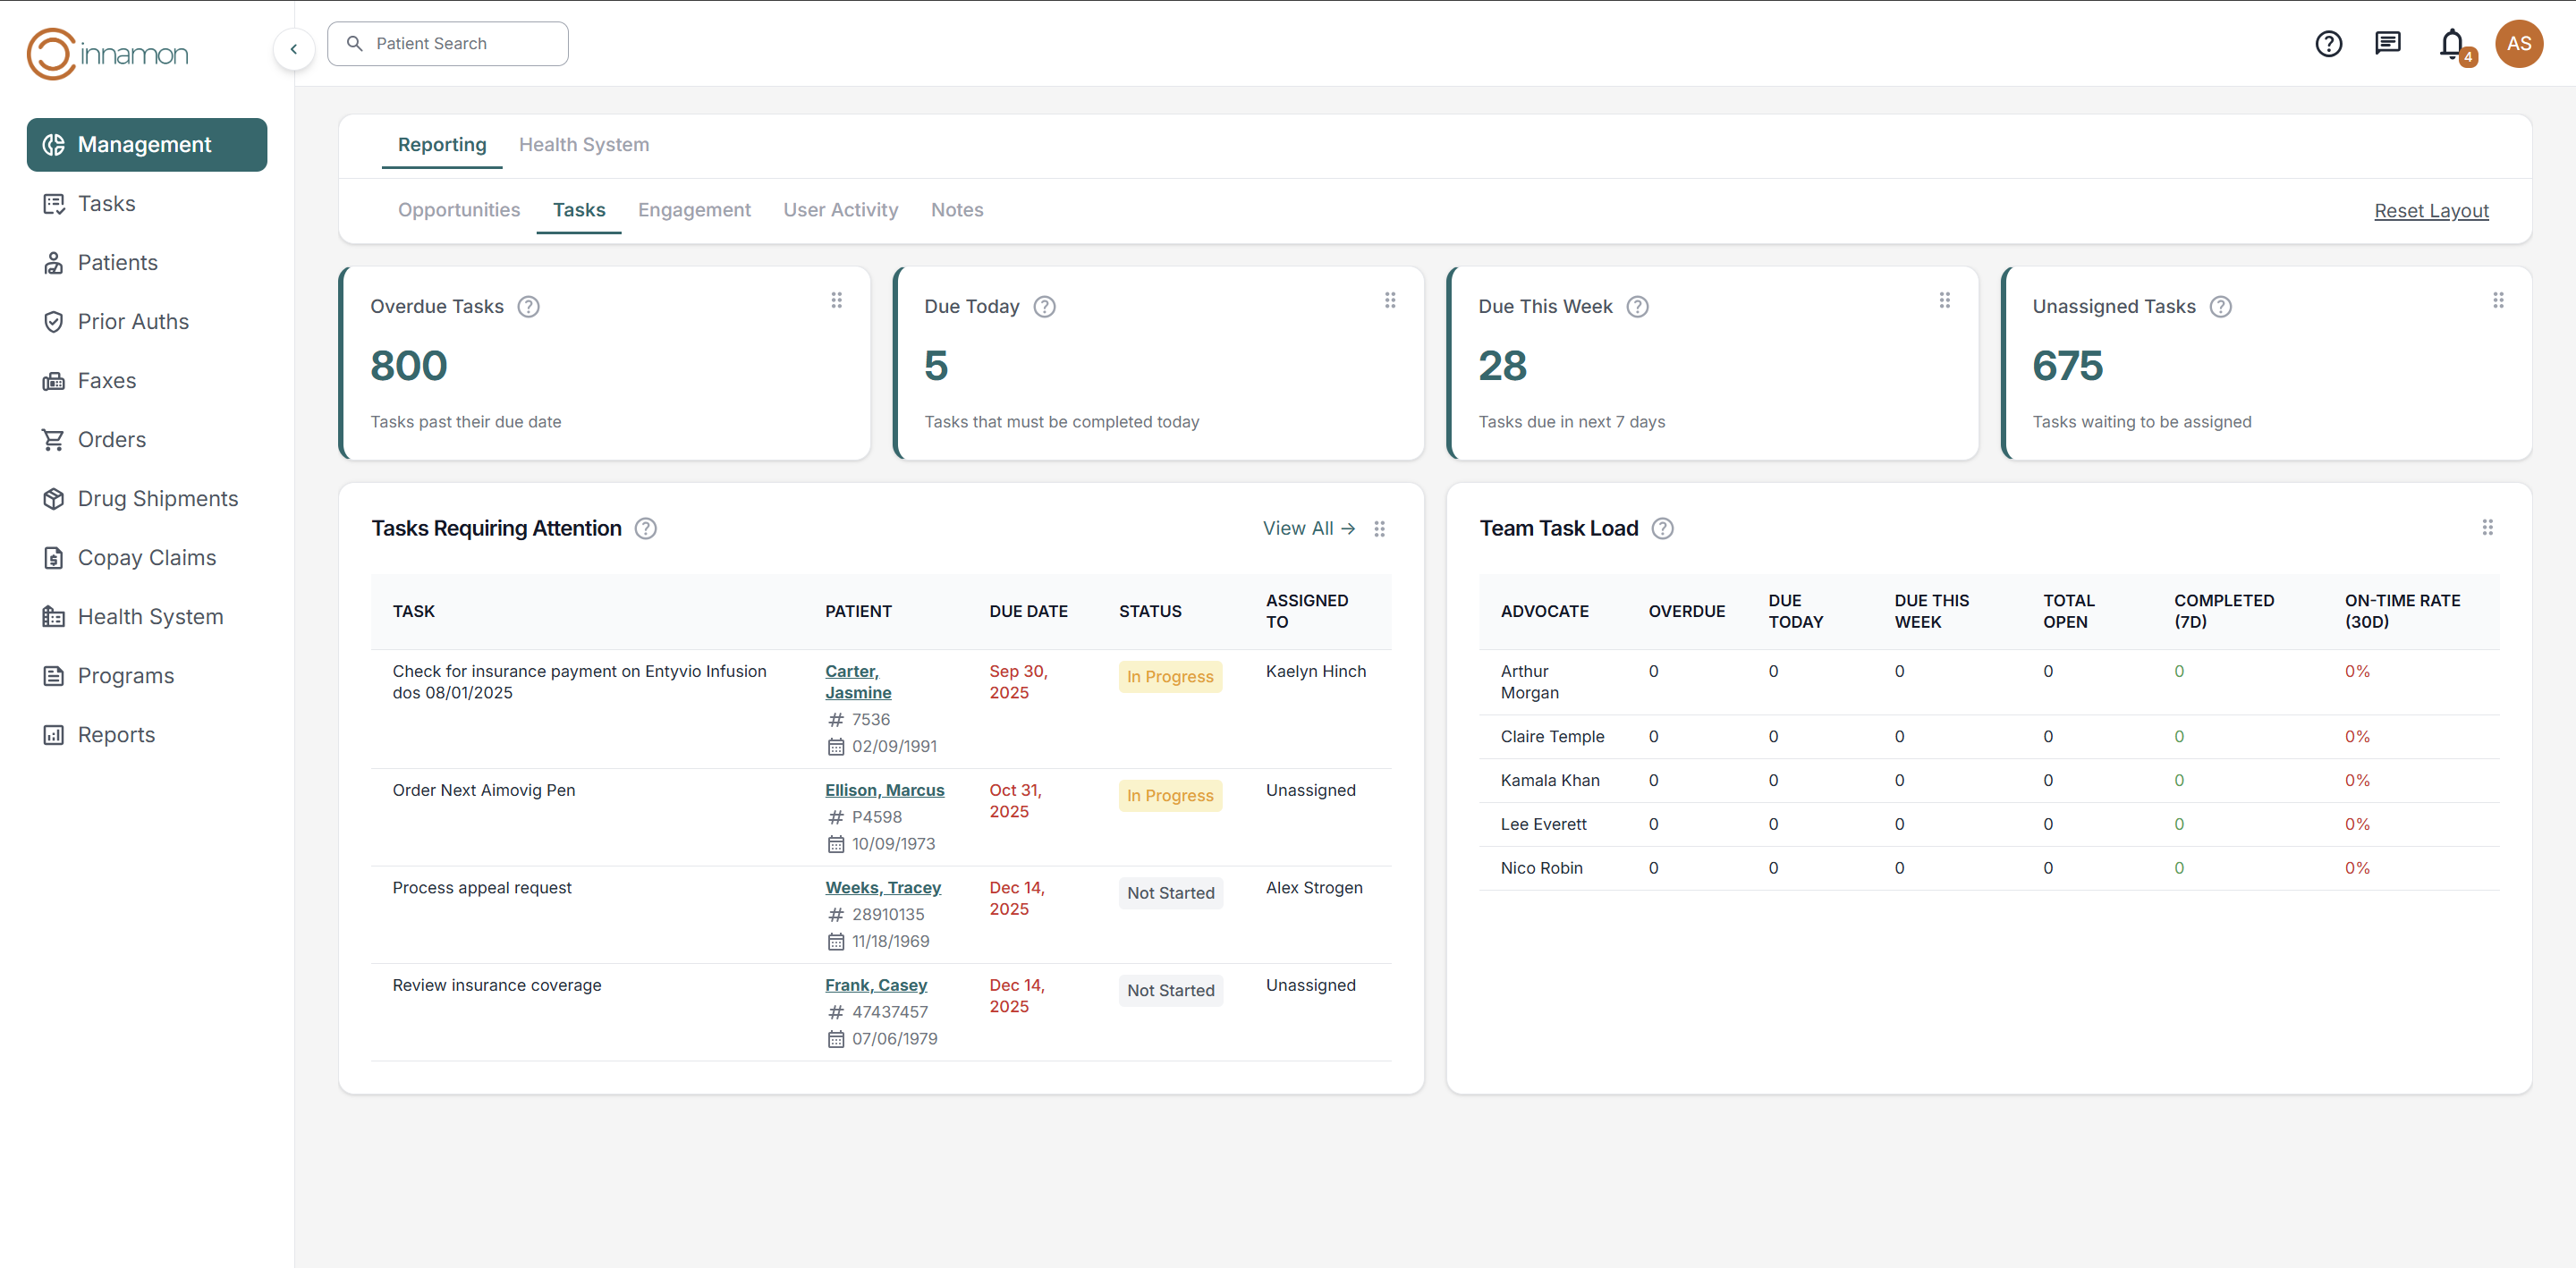
In the Management dashboard, Managers have access to a comprehensive set of reports including Opportunities, Tasks, Engagement, User Activity, and Notes. These reports can be filtered by both ‘location’ and ‘department’.
Opportunities Report: The Opportunities report provides enrollment data visualization for the following:
- Eligible Opportunities
- Unassigned Opportunities
- Assigned Opportunities
- Actively Working
- Opportunities Growth & Burn Rate (30 Days)
- Expiring Opportunities
- Idle Opportunities
- Team Performance
- Opportunities by Program Type
Tasks Report: The Tasks report breaks down various task related metrics into the following:
- Overdue Tasks
- Due Today
- Due This Week
- Unassigned Tasks
- Tasks Requiring Attention
- Team Task Load
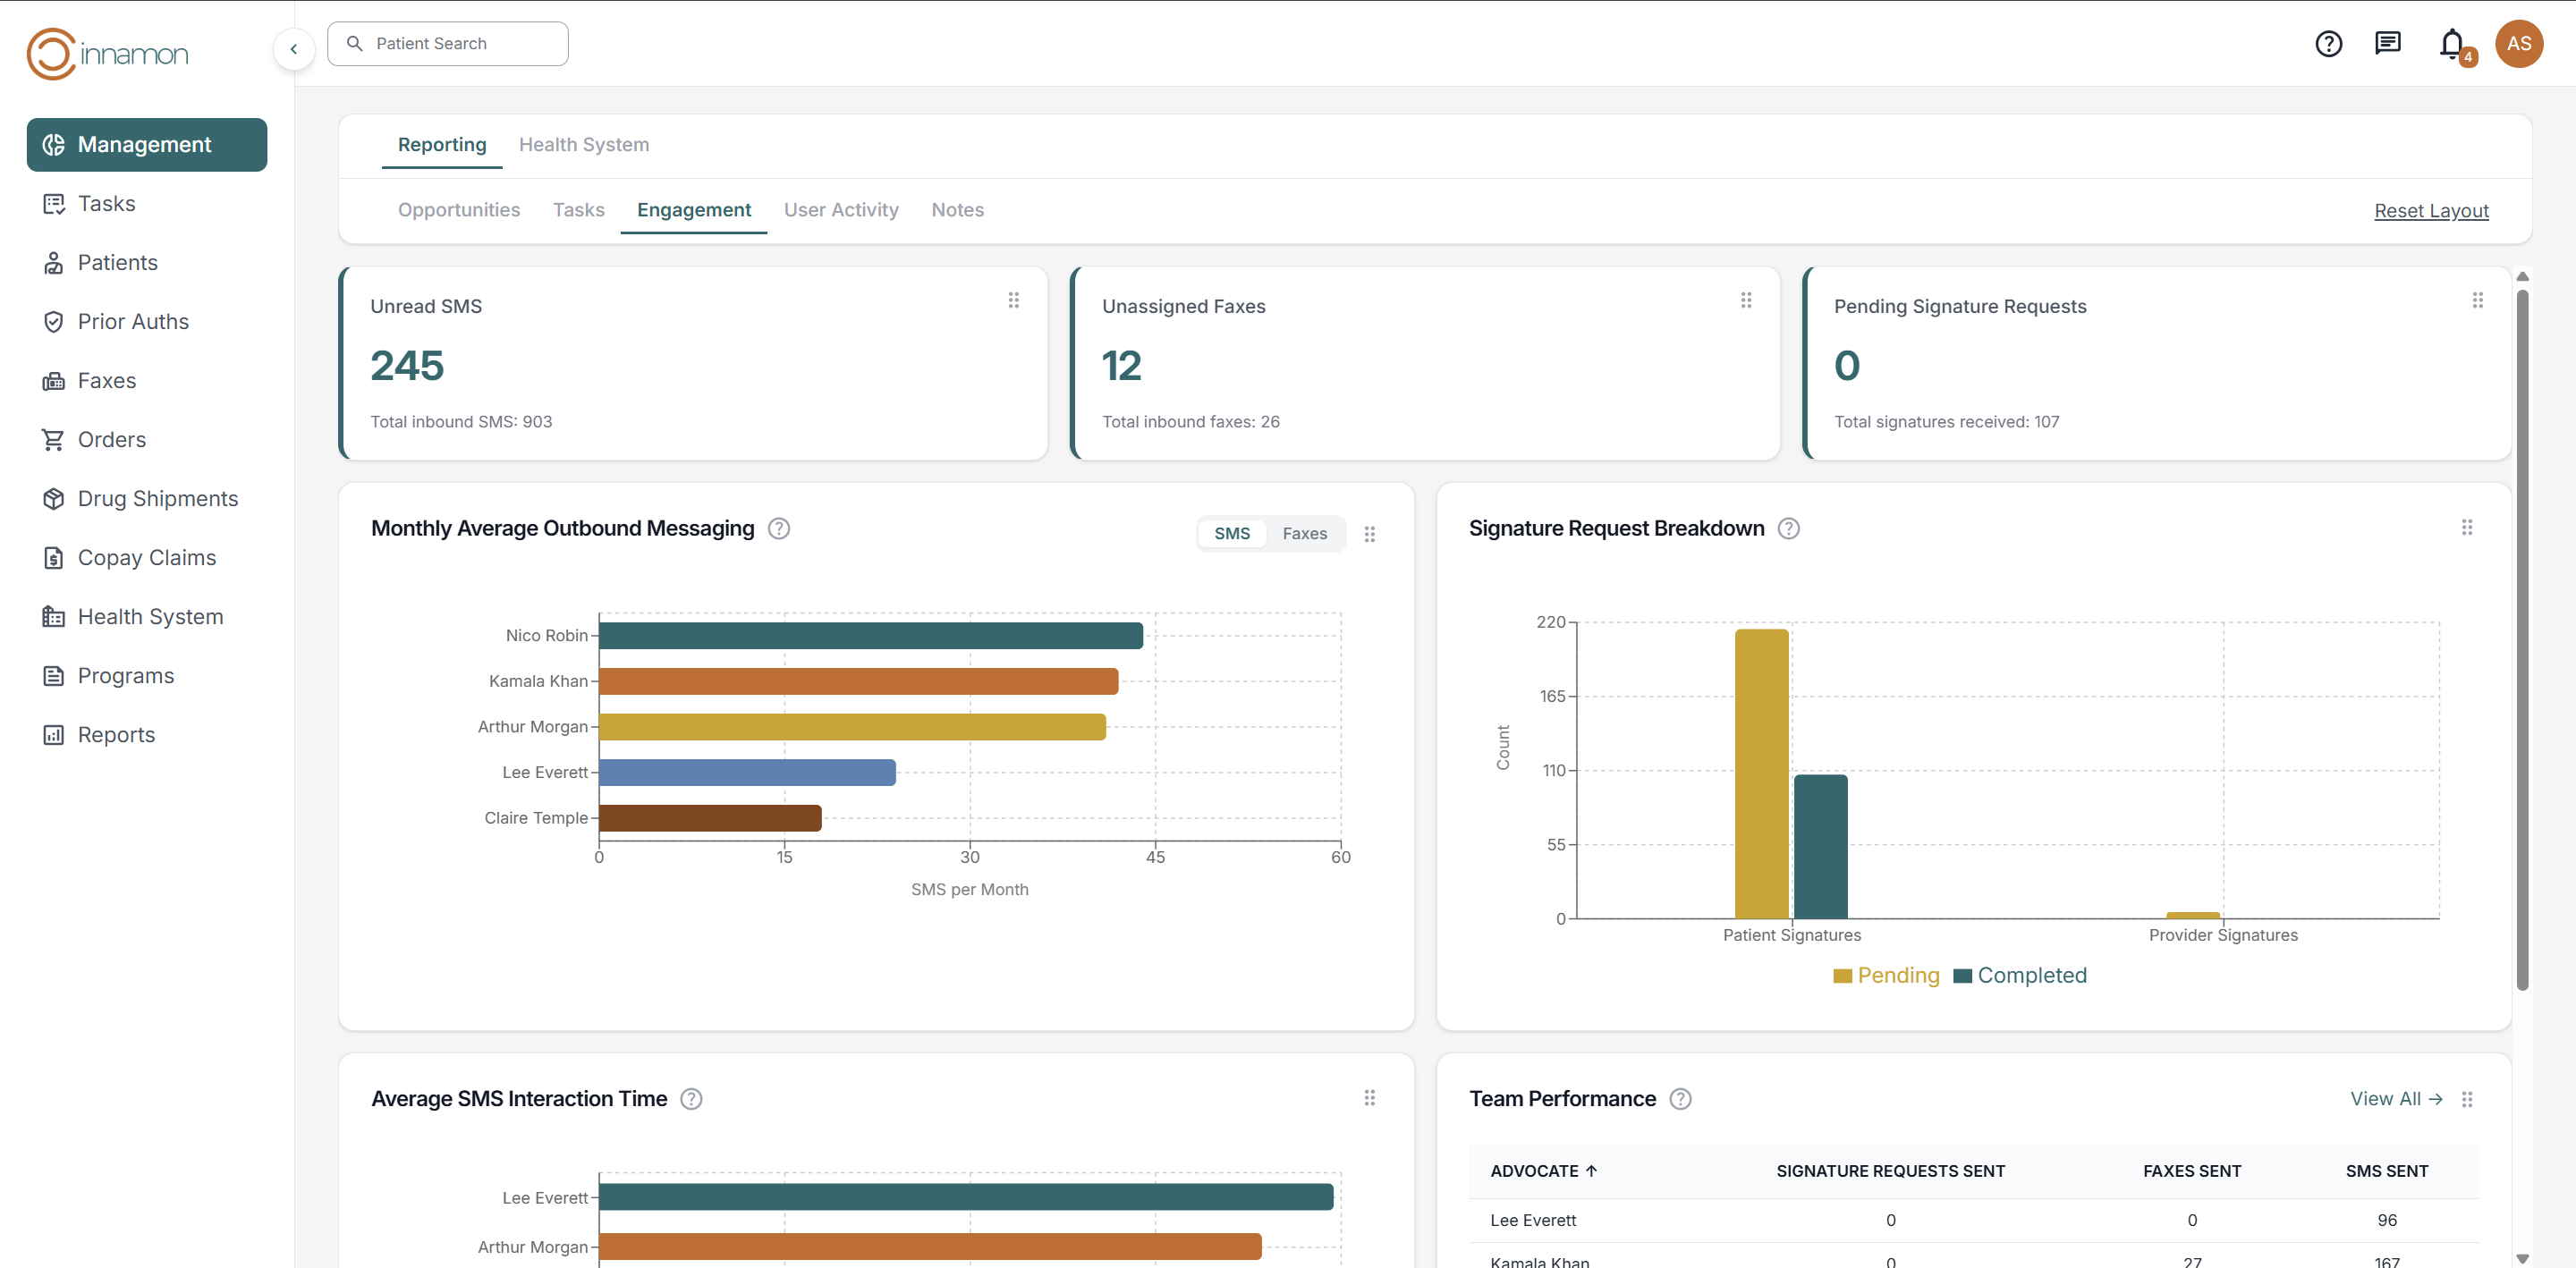
Engagement Report: The Engagement report tracks various metrics regarding user engagement including the following:
- Unread SMS
- Unassigned Faxes
- Pending Signature Requests
- Average SMS Interaction Time
- Monthly Average Outbound Messaging
- Signature Request Breakdown
- Team Performance
User Activity Report: The User Activity report includes a table of user metrics including the following:
- Logins
- Patients Assigned
- Enrollments
- Orders
- Drug Shipments
- Tasks Completed
- SMS
- Documents
- Signatures
- Notes
- Faxes
Notes Report: The Notes report tracks note metrics based on manager defined note categories.
Support
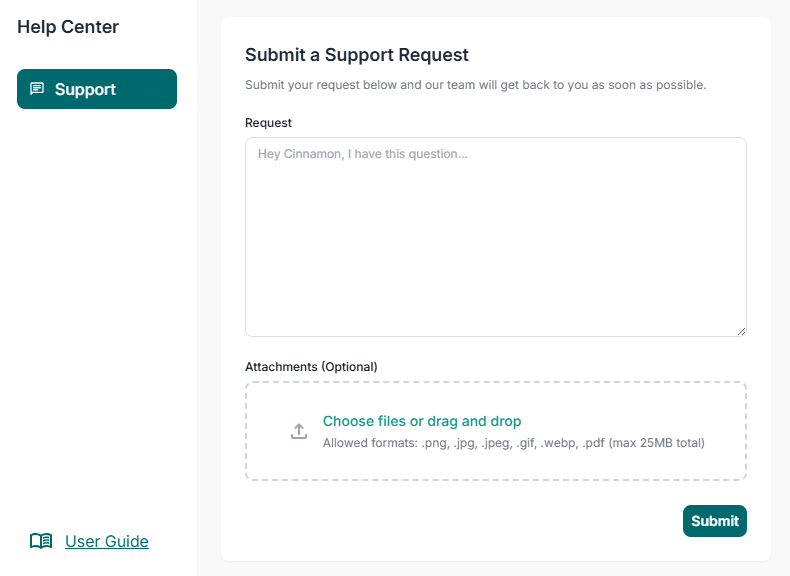
To submit a Support request, click the “Question Mark” icon located at the top right of the page. Users can submit trouble tickets, program requests, feature requests and more. To expedite the support process, users can attach any screenshots or forms related to their request.
Alternatively, users can send an email to support@cinnamon.health. The Cinnamon Support Team monitors all channels Monday through Friday from 8am EST to 8pm EST.